OpenAI's Image API Just Changed the Game (save 10 hours/week, n8n tutorial)
36.63k views4411 WordsCopy TextShare
Nate Herk | AI Automation
🌟 Skool community to go deeper with AI and connect with 1,100 like minded members👇
https://www.sk...
Video Transcript:
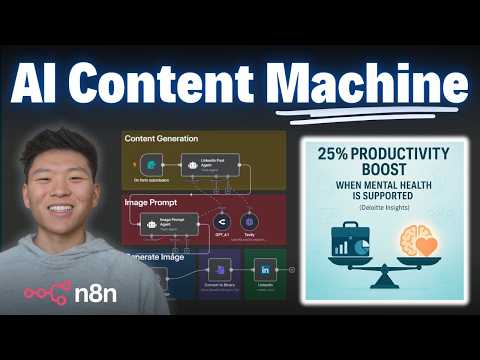
So, this workflow right here, all I had to do was enter in ROI on AI automation and it was able to spit out this LinkedIn post for me. And if you look at this graphic, it's insane. It looks super professional.
It even has a little LinkedIn logo in the corner, but it directly calls out the actual statistics that are in the post based on the research. And for this next one, all I typed in was mental health within the workplace. And it spit out this post.
According to Deote Insights, organizations that support mental health can see up to 25% increase in productivity. And as you can see down here, it's just a beautiful graphic. So, a few weeks ago when CHABT came out with their image generation model, you probably saw a lot of stuff on LinkedIn like this where people were turning themselves into action figures or some stuff like this where people were turning themselves into Pixar animation style photos or whatever it is.
And obviously, I had to try this out myself. And of course, this was very cool and everyone was getting really excited. But then I started to think about how could this image generation model actually be used to save time for a marketing team?
Because this new image model is actually good at spelling and it can make words that don't look like gibberish. It opens up a world of possibilities. So, here's a really quick example of me giving it a one-s sentence prompt and it spits out a poster that looks pretty solid.
Of course, we were limited to having to do this in chatbt and coming in here and typing, but now the API is released, so we can start to save hours and hours of time. And so, the automation I'm going to show with you guys today is going to help you turn an idea into a fully researched LinkedIn post with a graphic as well. And of course, we're going to walk through setting up the HTTP request to OpenAI's image generation model.
But what you can do is also download this entire template for free, and you can use it to post on LinkedIn, or you can also just kind of build on top of it to see how you can use image generation to save you hours and hours within some sort of marketing process. So, this workflow right here, all I had to do was enter in ROI on AI automation, and it was able to spit out this LinkedIn post for me. And if you look at this graphic, it's insane.
It looks super professional. It even has a little LinkedIn logo in the corner, but it directly calls out the actual statistics that are in the post based on the research. So 74% of organizations say their most advanced AI initiatives are meeting or exceeding ROI expectations right here.
And on the other side, we can see that only 26% of companies have achieved significant AIdriven gains so far, which is right here. And I was just extremely impressed by this one. And for this next one, all I typed in was mental health within the workplace.
and to spit out this post. According to Deote Insights, organizations that support mental health can see up to 25% increase in productivity. And as you can see down here, it's just a beautiful graphic, something that would probably take me 20 minutes in Canva.
And if you can now push out these posts in a minute rather than 20 minutes, you can start to push out more and more throughout the day and save hours every week. And because the post is being backed by research, the graphic is being backed by the research post, you're not polluting anything into the internet. A lot of people in my comments call it AI slop.
Anyways, let's do a quick live run of this workflow and then I'll walk through step by step how to set up this API call. And as always, if you want to download this workflow for free, all you have to do is join my free school community. Link is down in the description and then you can search for the title of the video.
You can go into YouTube resources. You need to find the post associated with this video. And then when you're in there, you'll be able to download this JSON file and that is the template.
So you download the JSON file, you'll go back into Nitn, you'll open up a new workflow and in the top right, you'll go to import from file. mp import that JSON file and then there'll be a little sticky note with a setup guide just sort of telling you what you need to plug in to get this thing to work for you. Okay, quick disclaimer though.
I'm not actually going to post this to LinkedIn. You certainly could, but um I'm just going to basically send the post as well as the attachment to my email because I don't want to post on LinkedIn right now. Anyways, as you can see here, this workflow is starting with a form submission.
So, if I hit test workflow, it's going to pop up with a form where we have to enter in our email for the workflow to send us the results, topic of the post, and then also I threw in here a target audience. So, you could have these posts be kind of flavored towards a specific audience if you want to. Okay, so this form is waiting for us.
I put in my email. I put the topic of morning versus night people and the target audience is working adults. So, we'll hit submit, close out of here, and we'll see the LinkedIn post agent is going to start up.
It's using Tavi here for research and it's going to create that post and then pass the post on to the image prompt agent and that image prompt agent is going to read the post and basically create a prompt to feed into OpenAI's image generator. And as you can see, it's doing that right now. We're going to get that back as a base 64 string and then we're just converting that to binary so we can actually post that on LinkedIn or send that in email as an attachment.
and we'll break down all these steps, but let's just wait and see what these results look like here. Okay, so all that just finished up. Let me pop over to email.
So in email, we got our new LinkedIn post. Are you a morning lark or a night owl? The science of productivity.
I'm not going to read through this right now exactly, but let's take a look at the image we got. When are you most productive? In the morning, plus 10% productivity or night owls thrive in flexibility.
I mean, this is insane. This is a really good graphic. Okay, so now that we've seen again how good this is, let's just break down what's going on.
We're going to start off with the LinkedIn post agent. All we're doing is we're feeding in two things from the form submission, which was what is the topic of the post as well as who's the target audience. So, right here, you can see morning versus night people and working adults.
And then we move into the actual system prompt, which I'm not going to read through this entire thing. If you download the template, the prompt will be in there for you to look at. But basically, I told it you are an AI agent specialized in creating professional, educational, and engaging LinkedIn posts based on a topic provided by the user.
We told it that it has a tool called Tavali that it will use to search the web and gather accurate information and that the post should be written to appeal to the provided target audience. And then basically just some more information about how to structure the post, what it should output and then an example which is basically you receive a topic. You search the web, you draft the post and you format it with source citations, clean structure, optional hashtags and a call to action at the end.
And as you can see what it outputs is a super clean LinkedIn post right here. So then what we're going to do is basically we're feeding this output directly into that next agent. And by the way, they're both using chat GBT 4.
1 through open router. All right, but before we look at the image prompt agent, let's just take a look at these two things down here. So the first one is the chat model that plugs into both image prompt agent and the LinkedIn post agent.
So all you have to do is go to open router, get an API key, and then you can choose from all these different models. And in here, I'm using Gbt 4. 1.
And then we have the actual tool that the LinkedIn agent uses for its research, which is Tavi. And what we're doing here is we're sending off a post request using an HTTP request tool to the Tavali endpoint. So this is where people typically start to feel overwhelmed when trying to set up these requests because it can be confusing when you're trying to look through that API documentation which is exactly why in my paid community I created a API and HTTP request deep dive because truthfully you need to understand how to set up these requests because being able to connect to different APIs is where the magic really happens.
So, Tavi just lets your LLM connect to the web and it's really good for web search and it also gives you a thousand free searches per month. So, that's the plan that I'm on. Anyways, once you're in here and you have an account and you get an API key, all I did was went to the Tavly search endpoint.
And you can see we have a curl statement right here where we have this endpoint. We have post as the method. We have this is how we authorize ourselves.
And this is all going to be pretty similar to the way that we set up the actual request to OpenAI's image generation API. So, I'm not going to dive into this too much. When you download this template, all you have to do is plug in your Tavi API.
But later in this video when we walk through setting up the request to OpenAI, this should make more sense. Anyways, the main thing to take away from this tool is that we're using a placeholder for the request because in the request we sent over to Tavi, we basically say, okay, here's the search query that we're going to search the internet for. And then we have all these other little settings we can tweak like the topic, how many results, how many chunks per source, all this kind of stuff.
All we really want to touch right now is the query. And as you can see, I put this in curly braces, meaning it's a placeholder. I'm calling the placeholder search term.
And down here, I'm defining that placeholder as what the user is searching for. So, as you can see, this data in the placeholder is going to be filled in by the model. So, based on our form submission, when we asked it to, you know, create a LinkedIn post about morning versus night people, it fills out the search term with latest research on productivity, morning people versus night people, and that's basically how it searches the internet.
And then we get our results back. And now it creates a LinkedIn post that we're ready to pass off to the next agent. So the output of this one gets fed into this next one, which all it has to do is read the output.
As you can see right here, we gave it the LinkedIn post, which is the full one that we just got spit out. And then our system message is basically telling it to turn that into an image prompt. This one is a little bit longer.
Not too bad, though. I'm not going to read the whole thing, but essentially we're telling it that it's going to be an AI agent that transforms a LinkedIn post into a visual image prompt for a textto-image AI generation model. So, we told it to read the post, identify the message, identify the takeaways, and then create a compelling graphic prompt that can be used with a textto image generator.
We gave it some output instructions like, you know, if there's numbers, try to work those into the prompt. Um, you can use, you know, text, charts, icons, shapes, overlays, anything like that. And then the very bottom here, we just gave it sort of like an example prompt format.
And you can see what it spits out is a image prompt. So it says a dynamic split screen infographic style graphic. Left side has a sunrise, it's bright yellow, and it has morning larks plus 10% productivity.
And the right side is a morning night sky, cool blue gradients, a crescent moon, all this kind of stuff. And that is exactly what we saw back in here when we look at our image. And so this is just so cool to me because first of all, I think it's really cool that it can read a post and kind of use its brain to say, "Okay, this would be a good, you know, graphic to be looking at while I'm reading this post, but then on top of that, it can actually just go create that for us.
" So, I think this stuff is super cool. You know, I remember back in September, I was working on a project where someone wanted me to help them with LinkedIn automated posting and they wanted visual elements as well and I was like, uh, I don't know, like that might have to be a couple month away thing when we have some better models and now we're here. So, it's just super exciting to see.
But anyways, now we're going to feed that output, the image prompt into the HTTP request to OpenAI. So, real quick, let's go take a look at OpenAI's documentation. So, of course, we have the GBT image API, which lets you create, edit, and transform images.
You've got different styles, of course. You can do like memes with a with text. You can do creative things.
You can turn other images into different images. You can do all this kind of stuff. And this is where it gets really cool, these posters and the visuals with words because that's the kind of stuff where typically AI image gen like wasn't there yet.
And one thing real quick in your OpenAI account, which is different than your chatbt account, this is where you add the billing for your OpenAI API calls. You have to have your organization verified in order to actually be able to access this model through API. Right now, it took me 2 minutes.
You basically just have to submit an ID and it has to verify that you're human and then you'll be verified and then you can use it. Otherwise, you're going to get an error message that looks like this that I got earlier today. But anyways, the verification process does not take too long.
Anyways, then you're going to head over to the API documentation that I will have linked in the description where we can see how we can actually create an image in NAD. So, we're going to dive deeper into this documentation in the later part of this video where I'm walking through a step-by-step setup of this. But, we're using the endpoint um which is going to create an image.
So, we have this URL right here. We're going to be creating a post request and then we just obviously have our things that we have to configure like the prompt in the body. We have to obviously send over some sort of API key.
We have to, you know, we can choose the size. We can choose the model. All this kind of stuff.
So back in NN, you can see that I'm sending a post request to that endpoint. For the headers, I set up my API key right here, but I'm going to show you guys a better way to do that in the later part of this video. And then for the body, we're saying, okay, I want to use the GBT image model.
Here's the actual prompt to use for the image which we dragged in from the image prompt agent. And then finally the size we just left it as that 1024 * 1024 square image. And so this is interesting because what we get back is we get back a massive base 64 code.
Like this thing is huge. I can't even scroll right now. My screen's kind of frozen.
Anyways, um yeah, there it goes. It just kind of lagged. But we got back this massive file.
We can see how many tokens this was. And then what we're going to do is we're going to convert that to binary data. So that's how we can actually get the file as an image.
As you can see now after we turn that nasty string into a file. We have the binary image right over here. So all I did was I basically just dragged in this field right here with that nasty string.
And then when you hit test step, you'll get that binary data. And then from there you have the binary data, you have the LinkedIn post. All you have to do is, you know, activate LinkedIn, drag it right in there.
Or you can just do what I did, which is I'm sending it to myself in email. And of course, before you guys yell at me, let's just talk about how much this run costed me. So, this was 4,273 tokens.
And if we look at this API and we go down to the pricing section, we can see that for image output tokens, which was generated images, it's going to be 40 bucks for a million tokens, which comes out to about 17 cents. If you can see that right here, hopefully I did the math right. But really, for the quality and kind of for the industry standard I've seen for price, that's on the cheaper end.
And as you can see down here, it translates roughly to 2 cents, 7 cents, 19 cents per generated image for low, medium, blah blah blah blah blah. But anyways, now that that's out of the way, let's just set up an HTTP request to that API and generate an image. So, I'm going to add a first step.
I'm just going to grab an HTTP request. So, I'm just going to head over to the actual API documentation from OpenAI on how to create an image and how to hit this endpoint. And all we're going to do is we're going to copy this curl command over here on the right.
If it you're not seeing a curl command, if you're seeing Python, just change that to curl. Copy that. And then we're going to go back into nitn hit import curl.
Paste that in there. And then once we hit import, we're almost done. So that curl statement basically just autopop populated almost everything we need to do.
Now we just have a few minor tweaks. But as you can see, it changed the method to post. It gave us the correct URL endpoint already.
It has us sending a header, which is our authorization, and then it has our body parameters filled out where all we'd really have to change here is the prompt. And if we wanted to, we can customize this kind of stuff. And that's why it's going to be really helpful to be able to understand and read API documentation so you know how to customize these different requests.
Basically, all of these little things here like prompt, background, model, n, output format, they're just little levers that you can pull and tweak in order to change your output. But we're not going to dive too deep into that right now. Let's just see how we can create an image.
Anyways, before we grab our API key and plug that in, when you're in your OpenAI account, make sure that your organization is verified. Otherwise, you're going to get this error message and it's not going to let you access the model. Doesn't take long.
just submit an ID and then also make sure that you have billing information set up so you can actually pay for um an image. But then you're going to go down here to API keys. You're going to create new secret key.
This one's going to be called image test just for now. And then you're going to copy that API key. Now back in any then it has this already set up for us where all we need to do is delete all this.
We're going to keep the space after bearer and we can paste in our API key like that and we're good to go. But if you want a better method to be able to save this key in Nadn so you don't have to go find it every time, what you can do is come to authentication, go to general or actually no it's generic and then you're going to choose header off and we know it's header because right here we're sending headers as a header parameter and this is where we're authorizing ourselves. So we're just going to do the same up here with the header off and then we're going to create a new one.
I'm just going to call this one OpenAI image just so we can keep ourselves organized. And then you're going to do the same thing as what we saw down in that header parameter field. Meaning the authorization is the name and then the value was bearer space API key.
So that's all I'm going to do. I'm going to hit save. We are now authorized to access this endpoint.
And I'm just going to turn off sending headers because we're technically sending headers right up here with our authentication. So we should be good now. Right now we'll be getting an image of a cute baby sea otter.
Um, and I'm just going to say making pancakes. And we'll hit test step. And this should be running right now.
Um, okay. So, bad request. Please check your parameters.
Invalid type for n. It expected an integer, but it got a string instead. So, if you go back to the API documentation, we can see n right here.
It should be integer or null, and it's also optional. So, I'm just going to delete that. We don't really need that.
And I'm going to hit test step. And while that's running real quick, we'll just go back at n. And this basically says the number of images to generate must be between 1 and 10.
So that's like one of those little levers you could tweak like I was talking about if you want to customize your request. But right now by default it's only going to give us one. Looks like this HTTP request is working.
So I'll check in with you guys in 20 seconds when this is done. Okay. So now that that finished up, didn't take too long.
We have a few things and all we really need is this base 64. But we can see again this one costed around 17. And now we just have to turn this into binary so we can actually view an image.
So I'm going to add a plus after the HTTP request. I'm just going to type in binary. And we can see convert to file, which is going to convert JSON data to binary data.
And all we want to do here is move a B 64 string to file because this is a B 64 JSON. And this basically represents the image. So I'm going to drag that into there.
And then when I hit test step, we should be getting a binary image output in a field called data. As you can see right here, and this should be our image of a cute sea otter making pancakes, as you can see. Um, it's not super realistic, and that's because the prompt didn't have any like photorealistic, hyperrealistic elements in there, but you can easily make it do so.
And of course, I was playing around with this earlier, and just to show you guys, you can make some pretty cool realistic images, here was um a post I made about um if ancient Rome had access to iPhones. And obviously, this is not like a real Twitter account. Um, but this is a dinosaurs evolved into modern-day influencers.
This was just for me testing like an automation using this API and auto posting, but not as practical as like these LinkedIn graphics. But if you guys want to see a video sort of like this, let me know. Or if you also want to see a more evolved version of the LinkedIn posting flow and how we can make it even more robust and even more automated, then definitely let me know about that as well.
But that's going to do it. That is how you set up this HTTP request right there. And then we can turn that 64 into a binary image that we can then use for whatever we want.
So, thanks for watching everyone. If you enjoyed this one, if you found it helpful, please give it a like. Definitely helps me out a ton.
And as always, appreciate you making it to the end. I'll see you guys in the next video. Thanks so much everyone.
Related Videos

20:15
Build Anything with Lovable + n8n AI Agent...
Nate Herk | AI Automation
62,349 views

16:51
How to Create Full Animated Stories Using ...
Emmanuel Crown
169,732 views

13:20
Stanford Creativity Expert: This Simple Sh...
EO
361,521 views
28:33
I Built Deep Research That Beats Perplexit...
Nate Herk | AI Automation
35,024 views
7:36
How I Built a Talking AI Agent with Eleven...
SW Automation
282 views

1:31:42
Watch Me Start & Sell An AI Service in 10 ...
Nick Saraev
68,074 views
39:21
Build AI Agents for anything & everything ...
David Ondrej
28,967 views

44:23
3 AI Workflows Step-by-Step (Beginner's Gu...
Nate Herk | AI Automation
22,259 views

16:04
How MCPs Make Agents Smarter (for non-tech...
Nate Herk | AI Automation
77,279 views
26:15
AI Coding is NOT ENOUGH: Claude Code's NEX...
IndyDevDan
40,495 views

15:37
MCP Explained in 15 Mins | Build Your Own ...
Helena Liu
30,613 views
17:32
Lovable 2.0 is insane… vibe-code anything ...
David Ondrej
44,990 views
15:34
OpenAI’s 7 Hour AI Agents Course in 15 Min...
David Ondrej
43,502 views
13:52
This AI Agent Picks Its Own Brain (10x Che...
Nate Herk | AI Automation
14,566 views

26:46
Sell AI Systems, Not AI Agents (how I made...
JP Middleton
74,903 views

36:54
But what is quantum computing? (Grover's ...
3Blue1Brown
668,528 views

30:26
This ChatGPT SECRET Automates Nearly Every...
Jono Catliff
13,464 views

19:57
Build Epic Startups: NotebookLM + Gemini 2...
Blazing Zebra
137,869 views

47:35
n8n Tutorial: Build ANYTHING with MCP Serv...
Productive Dude
23,565 views

19:27
How I'd Teach a 10 Year Old to Build AI Ag...
Nate Herk | AI Automation
196,187 views