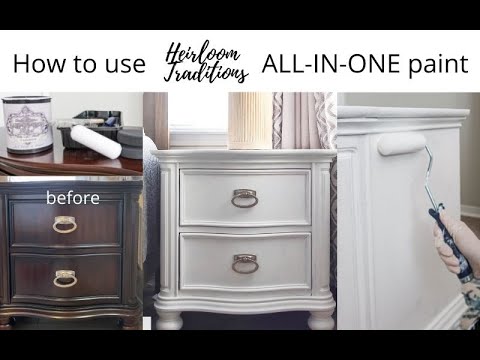
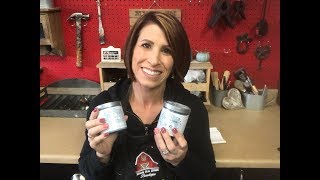
hey guys it's Lindsey at the blog repurpose and upcycle today i'm going to be going over a bedside table makeover with heirloom traditions all-in-one paint before we get started let's talk about heirloom traditions paint heirloom traditions is a fairly new paint that's considered all in one and what that means is they've combined the primer the paint and the sealer all in one paint now i'll be honest i'm a huge fan of primer i feel like it's just almost a necessity especially when you're doing furniture painting so i was a little hesitant to try the heirloom
traditions all-in-one paint without primer but i'm going to show you how to paint this without it now heirloom traditions is not a chalk paint a few things about heirloom traditions before we begin you can't slap the paint on expect it to dry and look completely smooth there definitely is a technique to using this paint the first time i use this paint i went with the technique i generally used to paint laminate furniture which is brush it on with the first coat and then the second or maybe even the third coat use a foam brush to
really reduce brush strokes now this paint is thicker than most paints most furniture paints like chalk paints and milk paints but if you think about it this is an all-in-one paint so if we're combining primer paint and sealer it makes sense that it is thicker but with it being thicker it takes a little more technique to eliminate brush strokes the heirloom traditions has some fabulous video tutorials and even step-by-step instructions on their website and to be honest with you i didn't use those instructions when i first used this paint and it didn't turn out so
i'm going to show you my mistakes and i'm going to show you how to successfully use this paint to get an ultra smooth finish before you think about painting anything you're going to want to clean and degrease your furniture piece really well because you're not using a primer you want to make sure that the surface is absolutely clean and free of any sort of debris i used a liquid sandpaper deglosser product and i've already wiped it down with a lint-free cloth i let it dry and now we're ready to paint before we get into painting
the bedside table i want to talk about the technique that i said that is really important to use when using this paint now like i said a second ago before i just slapped the paint on with a paintbrush and then i used a foam brush to try to go over it well the paint is thicker it dries thicker so those brush strokes i couldn't just go over it with a foam brush and eliminate those brush strokes they were still there and that was totally my fault that's just the way i've done other paints that's the
way i painted laminate furniture so i figured that would work but this paint is a wee bit different and they're very up front about saying really there are two techniques you can use you can use a brush and stipple which is where you use this handy foam piece and what you do is you brush a really thick coat on and then you go back with a really light stipple method and you just barely touch the surface of that and you stipple the surface so you get a smooth finish and you don't see those brush strokes
now the other way you can do it and this is how i'm mostly gonna the the technique that i'm mostly gonna use today it's the brush and roll technique so you're gonna put a heavy coat of paint on then you're gonna take your foam roller and you're just going to roll it to really even out the surface another thing about this paint which is good and bad it dries ultra ultra fast i'm talking like 30 minutes it's really good if you want to get your project done fast but the bad part is you got to
be really mindful of paint drips and areas that like to puddle paint you really got to stay on top of that and that's what i love to use this foam pad for i can go in and i can really pull up where the paint has puddled or if there's like a paint drip so i'm going to use all three of these products i'm going to use the paint brush i'm going to use the foam roller and i'm going to use the foam pad and i'm going to show you how i'm going to successfully paint this
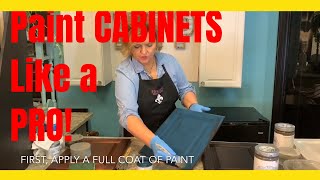
bedside table with the heirloom traditions paint all right guys i'm going to start i think on the front with the drawers and i put a lot of paint up here in my paint tray i'm going to take my paintbrush okay i'm going to put a good bit of paint on my paintbrush and don't ever worry about using too much paint this is a thick product you're not going to hurt anything if you use too much paint but you if you don't use enough when you roll it or you stipple it you're not going to get
that even looking finish so i'm just putting a really heavy coat on here okay and you will notice that well another thing i noticed about this paint is it really doesn't seem to go as far as most paints but then again when you remember that this is replacing a primer paint and a sealer it makes sense that it might not go quite as far because really it's all three in one okay so once i get that base coat on i'm gonna put a really light coat of paint on my roller by the way this is
a fine finish foam roller and i'm just going to lightly lightly as the key i'm going to lightly go over it now the first coat this is on any piece of furniture really the first coat never looks good okay so don't expect the first coat to look great it's always the second coat that's really going to even things out now i'm going to take my little sponge and this is where i'm going to stipple i'm going to stipple the sides and one tip i have with this is don't push in on it cause when you
push in on it you're going to pull the paint up what you're going to do is you're just going to barely put pressure and stipple that just like that and like i said this paint dries super fast so you've got to be diligent about paint puddles and paint drips but okay so there's that like i said it doesn't look great the first coat is always ugly once i've moved on from this i'm going to continue on and do the lower one there's not really any rhyme or reason to this as far as painting dressers bedside
tables everybody tends to do it differently like i said there's not really any rhyme or reason to it some people will tell you there's a better technique than others but every piece of furniture is different so now i'm just going to stipple it and after this first coat dries i'm going to pull these drawers out and paint the sides and paint the areas that i can't see now when you're painting dressers or anything with a ton of little crevices just make sure you get that paint deep down in the crevices okay just like that and
like i said after i'm done with the first coat i'm going to pull these drawers out and see if there's anything inside of them that i need to cover with paint make sure you don't have too much paint on your paint roller just roll that and what this is doing is eliminating the brush strokes because like i said this is a thicker paint it will show brushstrokes so the first time i used this paint where i went wrong like i said was i i put the first coat on with a brush and when it dried
i just couldn't cover up the brush strokes so what i had to end up doing was sanding it down with a fine grit sandpaper and then going back over it with a foam brush so this time around i'm hopefully doing it the right way doing it the way i should have done from the beginning um yeah i hate to tell on myself but sometimes i feel like it's easier to learn from mistakes than me telling you how to do it like i said it doesn't look great but that second coat is where you're really going
to be able to see the difference we just want to make sure we're as smooth as we can on the first coat really be mindful about the corners where paint can glob up especially with this paint because it is thicker i had this one little area i couldn't get paint up into so let me use this so the first coat of paint is on and it's dry i can rub my my fingers across it i got gloves this time i got smart and it's completely dry so now it's time for the second coat and the
second coat you put on just like the first coat you're just going to put that paint on and then you're going to stipple it or staple it and roll it so this time i think i'm going to start by just rolling the center see how much smoother that looks i love coming in with the second coat when it finally looks like a pretty painted piece of furniture that first coat just never looks good okay and i'm not putting pressure because if you put pressure there you don't have enough paint on your paint roller okay so
now i'm going to take my brush i'm just going to go in the corners okay just like that just to get an even coat make sure i have enough paint on and most of the tutorials i've watched most of them say two coats is good so we'll have to let that dry and see but guys i'm just going to continue on with this method until i get it done and then we will reevaluate and see what it looks like all right y'all i am nearing the end of the second coat i just wanted to show
you the top it's looking much better and like i said this paint the one thing you have to keep in mind is that you really need to use quite a bit of it and then immediately after you put it on if you do it with a paint brush you really need to smooth it out it's thicker it will cause it will cause brush strokes if you're not careful so just those are that's really my biggest tip with this paint is being mindful of paint drips because it dries so fast and really making sure about those
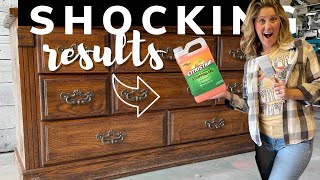
brush strokes about if you you know brush and roll or brush and stipple and i've done both especially in areas where you you have a little bit of air it's not a flat surface you're gonna have to stipple it okay and here is this i'm going to let that i'm going to let this dry for about a half an hour to an hour and see if i need a third coat let's talk durability for a minute this is the one that i previously painted and i had to do like three coats just to to get
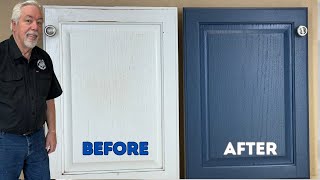
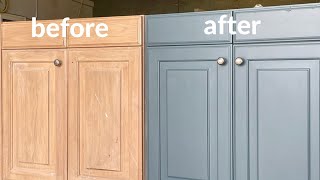
it back to where it didn't look like it had a lot of streaks like brush strokes so i want to talk about durability this has been painted for about a week and you can see i can scratch my fingernail really hard and nothing comes off so as far as durability i'm super pleased i've had my phone i've had like three or four different tv remotes and so far nothing has been scratched here it is guys i have two full coats and it looks amazing now i did go ahead and put three coats on the top
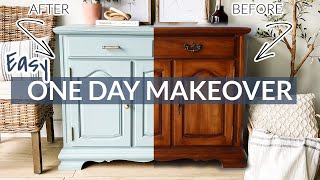
just to give it just an extra level of smoothness um just because really the top is mainly what you're going to see but overall i'm really pleased remember i went from a very very dark laminate veneer to this beautiful white bedside table so i hope i've given you some advice and some helpful tips to create successful paint projects with heirloom all-in-one paint thanks for watching guys make sure to like and subscribe so you don't miss a video you