Candle Science Determines How Much Entry Confirmation You Need
89.52k views4045 WordsCopy TextShare
Arjo
How much Entry Confirmation you need, using Candle Science, FVGs and ST.
Join the MMT 👉 https://tr...
Video Transcript:
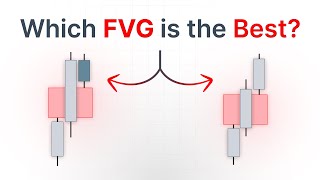
I get this question quite often hey Ario why does my entry faill my answer is it's the PD Ray that you use the entry in let me explain we need to understand that our entry and our entry confirmation is going to change based on the pdate that we are looking to confirm because the PD rate that we are looking to confirm is always going to be different for example if the market was always identical and we always had two F value gaps that are the exact same as the other one then we could use the
exact same entry confirmation all the time but that's not the case because one fair value Gap might be higher probability than the other fair value Gap so if that's a daily F value Gap that we are looking to confirm on the lower time frame then that already means that the higher probability for Val Gap needs less confirmation and the lower probability for Val Gap needs more confirmation on the lower time frame so that leads to the understanding that the entries change based on how much confirmation we need so how much confirmation do you actually need
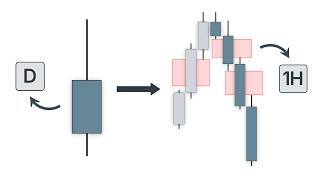
well there's two steps to it the first one is candle signs and the second one is confirmation now before diving into step one let me give you some context this all starts with the understanding of the other side of the market what do I mean with that when I do my analysis it helps to see the market from both sides and not just the side that I want to see play out for example I open a chart and I already know I want to see bullish price action but I still ask myself the question well
what would need to happen right there if we were actually going to become bearish if I don't do that I am going to be so fixated on one side of the market and I'm going to essentially marry a bias and I'm going to ignore and be blindsided by all the bad signs that we might have in price action the signs that tell us hey we're actually not going higher we're going to continue lower so what are some of these signs and that leads us to the first step candle signs and in this first step the
main question is is there a reason for price to do something else than what we initially expected now this is going to be determined by two things candle signs and fair value gaps but before we dive into those two things we first need to have of course the PD rate that we potentially want to confirm on the lower time frame so in this example I have used this 4our FIP right there which we can go ahead and confirm on the lower time frame but how much confirmation do we actually need well if we are bullish
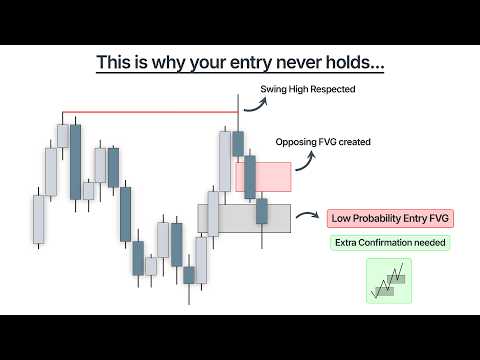
and we are expecting higher price off of this 4our F Gap then the amount of confirmation we are going to need is first determined by do we have a bearish sign which is where the first thing comes in and that was again Kendall signs we can start looking at those signs that we might want extra confirmation which is where Kendall signs comes in we want more confirmation of of a PD on the lower time frame if Kendall science is respecting an opposing PD on the same time frame or above so let me break that down
so from that sentence let's first break down that opposing PD part right there what's an opposing PDR well that depends on the trend because if we are bullish and we are trading off a discount array right there we are expecting higher price of a bullish fair value Gap that means that all the premium arrays so bearish fair value gaps bearish or blocks swing Highs are our opposing PD Rays so if we were to flip that around and we were having a bearish trend then the opposing PD Rays would be discount arrays so think of bullish
order blocks bullish breakout blocks bullish for V gaps swing lows now we want those opposing PD Rays to be unmitigated meaning that they have not been traded into before so for example this swing high right there has not been traded above before that means that that's a valid opposing PD R if we zoom out a little bit and we take a look at this 4our F Gap towards the left this 4our F Gap right there has already been traded into once right there so the second time we trade into it it's not valid anymore because
it's already been mitigated so it's not an unmitigated opposing PDR now please pay attention to that unmitigated or mitigated opposing PD detail because otherwise you lose a lot of accuracy for example we are reacting right here of the Swing High not the fair value Gap right there it's very important to understand all right so we have the opposing PD right there now there was a lot more in that sentence because we mentioned same time frame or above which is quite simple right quite straightforward That Swing high is on the 4-Hour time frame right there this
same time frame as the PD that we expect higher prices from so we're not going into the 1 hour or into the 15 minutes to find those opposing PD rats no opposing PD rat we want to find them on the same time frame as the pdate that we are looking to trade off of or above so the 4 Hour can still have a daily opposing PD or a weekly opposing PD that's fine all right so now we only need to understand the beginning of the sentence because what is respecting an opposing PD B based on
kandle science well in kandle science you can do either one of two things we are either respecting or disrespecting and candle signs is all seen through a singular candle so we only look at a singular candle right there and when we are respecting a premium Ray like this swing high for example we are wicking that premium Ray right there with a long Wick at the top right there and not closing above the premium rate that's quite important that is what we call in kandle science a respect kandle why is that a respect candle what is
actually the theory the logic behind it well that Wick right there on a singular candle basis is just a wick but what happened at that moment in time well we opened up in that candle we went higher we went above the swing high and then we came back down creating that top Wick right there but what happens on the lower time frame on the lower time frame that is seen through F gaps so we first had FBS going higher and then FBS going lower actually doing what creating a reversal so a respect candle like that
actually is a reversal on the lower time frame means we are respecting a PR Ray to potentially continue lower off off now the other candle that we talked about the disrespect candle is not that relevant in this case but let's still cover it a disrespect candle is simply when we also have an opposing pay like this that Premier Ray but we simply close above it so we don't have that long Wick at the top like we have with this swing high in other words we only have fair value gaps on the lower time frame pointing
higher they never come back down meaning we can continue in that direction of disrespect so when we then use the replay tool right here and pay attention to the order it's important to understand we first respect an opposing PD right there before coming back into that PD that we expect higher prices off of that we are looking to confirm on the lower time frame with our entry confirmation meaning first thing happens we reach above that pre rate right there so we reach a pre rate we are respecting that pre rate we have a discount rate
that we might want to continue higher off off so we want to confirm that on the lower time frame but if we are respecting this prate whilst coming back into the discount rate that we are expecting higher price off of that means that we automatically want more confirmation off of this discount rate right there so the entry confirmation needs to be more which is what we're going to go over in step two too now this is the candle science part and let me give you a few more examples here on gu the exact same thing
happens this daily F Gap and this daily fair value Gap as well in both those daily value gaps you would want to see more confirmation than usual why if we actually zoom out and go to the weekly time frame then on the weekly we see that we are delivering into this weekly fair value Gap right there and we also actually have a breaker right there and in both those scenarios the weekly F Gap and the weekly breaker are responsible for the retracement that gets created in other words we are respecting an opposing PD right here
and whilst respecting those opposing PD rates we are retracing back into the pre rise that we might want to see lower prices off of and in both those scenarios you will notice price is struggling to initially continue lower but it does eventually continue lower just like what we saw on gold price is struggling a little bit but eventually it does continue higher now it's very important to understand right there that yes in hindsight here it plays out but in life situations often times people are going to take a few losses before they catch that winner
and we can all catch the winner every single time I promise you but how many losses are you catching before you take that winner because if we catch even let's say two or three losses before we actually catch the winning trade that follows through we are overall at a net loss so we need to avoid the the losses before the winner comes which comes from extra confirmation now we discussed more confirmation is going to be determined by two things candle signs and fair value gaps in the previous two examples we discussed candle signs here on
Australian dollar US dollar if we again have that discount rate we want to continue higher off of either the order block either for Gap does not really matter right there but the more important part is that we have this swing high that we are respecting whilst creating the retrace ment back into the discount array now that was the candle science and we understood that but now with that candle science if we also create on the same time frame a fair value Gap coming back into the discount array that we are looking to confirm on the
lower time frame we need even more confirmation because now we have candle signs right there so there's one argument that we might want to continue lower because we are respecting a premium rate and there's another argument we also created a barrier fair value Gap right there so that's double so we want essentially double the confirmation right there if we still want to continue higher so now we understand that thought process of seeing the market from both sides because a lot of people go wrong when you only have this discount array on your chart right there
but think about it like this if we are going to continue lower we are indeed going to sweep and respect that swing High to then actually create a bearish fair value Gap as well to then put potentially continue lower does that mean we want to look at bearish prices no because the overall ID was still being bullish it just means we want more confirmation now before diving into step two let me also give you an example of a PD that doesn't need that extra confirmation for example right here we are on crude oil and we
are aiming for this high right there we are not offering this fair value at this low right there to continue lower we create Breakaway gaps to continue higher and on the 4H hour if we find a discount rate to continue higher off of we can see we have this 4-Hour fair value Gap right there and doing all this by the way without respecting an opposing PD and without creating a fair value Gap coming back into the PDR this leads us to the understanding that this fair value Gap or even fair value Gap higher as well
needs less confirmation and we can just use the normal entry confirmation right there because the PD rate itself is already high probability now I assume you're here to look for profitability as a Trader so if that's the case then please listen to what I'm about to tell because this is extremely important you need to set your expectations right when people learn about certain Concepts they think they can just use those Concepts everywhere which is not the case because there's always a probability attached to that certain scenario meaning an st for example sharp turn is beautiful
it's very fancy it looks very nice but it's the bare minimum confirmation you are going to need but if you and which is most likely the case you're not going to have that high probability PD rate to trade off of you are going to need more confirmation so what is more confirmation more confirmation is anything above the Baseline so what is the Baseline well the Baseline is your usual entry method meaning if we look at the following time frames right here then if we are talking about a monthly PD we want to confirm that with
a daily sharp term if we are looking at a weekly PD we want to confirm that with a 4H hour sharp turn a daily 1H hour sharp turn a 4H hour 15 minute sharp turn then the 1 hour 5 minute and the 15 minute the 1 minute and that right there is the Baseline for Sharp turns meaning that's the bare minimum amount of confirmation we need anything above that is more confirmation anything below that is too little confirmation meaning you don't want to go below that you don't off a daily fair value Gap daily PD
you don't want to confirm it with a 50-minute sharp turn it's never going to be enough in hindsight might be beautiful in real time you're going to take a lot of losses the one hour sharp turn is a perfect combination with a high probability daily PD but if that daily PD is not as high probability as we expect it to be according to the parameters in Step number one then we understand we want more so more confirmation above that 1 hour sharp turn so what could that be that could for example be a 4H hour
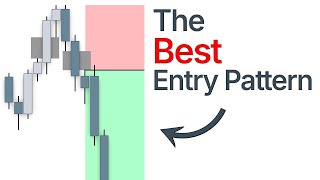
sharp turn now what does the sharp turn even look like let's first clarify that here we are looking at a 4H hour PD right there and on the 50 minute we also get a beautiful sharp turn right there a sharp turn is the following a sharp turn has a fair value Gap coming into the PDR that we are looking to confirm and afterwards it has a fair value Gap going out of that PDR as well now as mmt members you know there's quite some variables to understanding what a good sharp turn is and a bad
sharp turn Etc but for Simplicity sake I'm just going to say right here a sharp turn is on the time frames we just discussed a fair value Gap coming into the PD rate that we are looking to confirm and a fair value Gap going out of the PD those fair value gaps don't need to be overlapping as long as there's fair value Gap going in and F going out then that sharp turn can mean an entry of the first F gap of the creation of the FV Gap however you want to enter from that point
on now at this moment in time we see the 50-minute sharp turn also plays out actually right here but since this is a low probability PD rate on the 4our we actually want to go into the 1 hour so we want to go up a singular time frame to then confirm the sharp turn and right here we get this fair value Gap right there which we can enter off off because now we have even more confirmation again the closer the PD time frame and your entry confirmation time frame are to each other the less confirmation
you are going to need meaning the PD time frame that we are looking to confir firm is on the 4 Hour then the entry time frame right here is on the 1 hour there's no difference you have the 4 Hour and the 1 hour you can only use maybe the 4 Hour and the 4 Hour but in this case you don't need a lot of confirmation you might only need a fair Val Gap actually going higher so when we talk about going up a time frame the fair value Gap coming into the PD rate that
we are looking to confirm for example here on the 1 hour that's nice but it's not necessary as long as we have that extra confirmation of the fair going out right there of that PDR so here we get the perfect extra confirmation and we can still simply look to continue higher right there without having to worry if we might take a loss before that now you might say the 50-minute sharp turn also played out so why even use the extra confirmation again that's confirmation bias because this is One Singular example right here that I just
simply used for the video if you're also in mmt for example in live sessions we discuss very often how much confirmation you need Etc so it's all up front it's not in hindsight but to explain it more clearly so at this moment in time it's a scenario where we have a battle between this swing high right there that we are respecting and this fair value Gap meaning if we want to continue higher this F Gap will be respected if we continue lower this swing high will be respected so when we have a respect of that
opposing PD we always want more confirmation because we might just be trading the top and we might just continue lower instead now here we we have the Australian dollar US dollar situation where we not only had candle signs right there respecting an opposing P we also had a fair value Gap created against us so if we again look at the list then we see off of a high probability daily PD we only need a 1H hour sharp turn well in this case we already know based on candle science the previous example we want to up
that to a 4H hour sharp turn or at least a 4H hour F Gap out of the daily PD rate that we are looking to confirm but that's only if we had candle signs going against us because now we have two things going against us the candle signs and that fair value Gap so what we mentioned earlier we want double the confirmation now we know this discount array is even lower probability potentially so we not only want to have a 4our sharp turn but out of that 4our sharp turn also a new 4-Hour F Gap
what does that look like if we dive into the 4our right here then again we have this daily F Gap right there we have the 4our sharp turn sitting quite low right there that 4our sharp turn is not what we want to enter off of we want to enter of the next fair value Gap so that is essentially this fair value Gap right there can be of the creation of the fa value Gap can be whilst we sting into the F Gap as well right there and then we look to continue higher and you can
even confirm this through right so for example in this case this 4H hour sharp turn right here does not need to be your entry can also be the PD rate that you want to confirm again on the lower time frame so here we have this 4H hour fair value Gap the opposing PD rate that we are respecting calling back into that 4our V Gap that we might want to continue higher off of we again want more confirmation to avoid price action where we consolidate and then after we take a loss we take two losses and
then we start to continue higher now let's understand this scenario right here that we had on crude oil where we had that Target with this 4our fair value Gap sitting right there now then seeing the highest probability scenario right here on crude oil where this PD aray is already in itself high probability so we don't need extra confirmation then we can simply go into the 50 minute the usual entry confirmation that we have and enter off of that 15minute sharp turn that we have sitting right there which this by the way is a trade that
I caught myself as well and we mentioned as well in the mmt live session just to show you that we also apply it in live since it's quite mechanical we can also apply this in life so what is the mechanical thought procs behind it let's sum it up in Step number one we determined that if we are respecting an opposing PDR based on that candle science then we want extra confirmation in our PD Ray that we are looking to confirm now let's call that mid probability right there then we have low probability which was the
second scenario where we have candle signs and fair value gaps so we have two things going against us essentially when that happens we want want extra extra confirmation the double confirmation and then we at the high probability where we don't have any of those scenarios so we're not respecting an opposing PD we also don't create a fair value Gap going against us so we have high probability mid probability and low probability the step number two confirmation is the following high probability we just want to use the Baseline mid probability we want to go up a
time frame to then use the entry low probability we want that confirmation so the sharp turn that we talked about on a time frame above us like mid probability but then also a new fair value Gap out of that sharp turn so this the list take notes take a screenshot whatever you want to do again if you don't use sharp turn entries you can still use this in the following way if for example you don't even use f value gaps and you only use Market structure shift this is your mark structure shift right there and
just wait for an extra Market structure shift right there so whatever your current entry is everything above that everything extra is extra confirmation and that's exactly what you want to focus on when the conditions like that are met all right perfect thank you
Related Videos
19:33
Candle Science will Change The Way You Vie...
Arjo
112,497 views

2:26:15
EMERGENCY DEBATE: They Lied About The Econ...
The Diary Of A CEO
1,286,562 views

40:31
Arjo's World of Fair Value Gaps
Arjo
132,448 views
21:14
The “Sharp Turn” Entry Model
Arjo
118,704 views
24:07
Everything you need to know about Fair Val...
Arjo
79,541 views

16:15
Do This in Secret… And Watch the Universe ...
Ethereal Portal
216,893 views
39:19
Support And Resistance Didn't Work Till I ...
Rayner Teo
2,106,912 views
19:56
The Best Area to Take Trades
Arjo
88,083 views

4:02:45
The Super Flow State - 40 Hz Gamma Binaura...
The Power Of You
369,507 views
16:31
Master these 3 Concepts and you will be Pr...
Arjo
100,560 views
26:12
Always Wait For THIS Before Entering Trade...
The Rumers
130,300 views

32:34
The MATH OF WINNING in trading
The Art of Trading
837,723 views
31:01
FVG Secrets, But They Get Increasingly Mor...
Arjo
26,445 views

24:14
1 Candle Tells You Everything
Arjo
382,042 views

8:50
‘HERE WE GO AGAIN’: US denies this request...
Fox Business
464,529 views
18:19
2 concepts that will change your trading: ...
Arjo
122,146 views
35:38
Entries using Order Flow
Arjo
83,689 views

30:16
Simple and Effective Top Down Analysis Str...
Arjo
280,968 views

5:25
Pentagon sets record straight on 'egregiou...
Fox News
234,323 views

23:44
Master These 3 Concepts to Trade Profitably
JeaFx
213,318 views