💧Cómo Construir un Sistema de Hidroponia Vertical Fácil
246.36k views3259 WordsCopy TextShare

MiradasBiologicas
➤Este Sistema de Hidroponia Vertical, está pensado para que lo puedas usar en espacios pequeños como...
Video Transcript:
Today we are going to set up a vertical hydroponics system, but without using pots so that you can set it up in small spaces. We are going to prepare this system in PVC pipes that are 110 mm wide, it is one of the most common and since we are going to put all this in a bucket, I am going to cut it to approximately one and a half meters high, so that it is not such a tall column and that it could end up falling. Let's keep in mind that approximately 39 cm will remain inside the bucket, which is where we will have all the nutrient solution, so that it can feed all the plants.
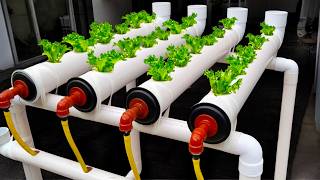
Depending on the amount of light we have at home, if we can make this system receive light from all sides, we can make a cross, where we will be able to put four plants, on the other hand if we are going to put this against a wall, on this side I am not going to recommend putting plants, because since it is not going to have a good amount of light, they are plants that are going to grow very weak, then we could put three plants, this is the system that we are going to prepare today, but if for example you want to put this system in a corner in your house, we are going to modify this one that we have up here and we are going to make it a little more closed angle and this way we are going to ensure that they have a good amount of light, so that they develop better. On the other hand, for the tube from above everything, we are going to leave about 10 cm, between one perforation and the next within the same line, we are going to leave about 20 cm and then between these perforations and the one that is going to be inserted in the middle, we are going to leave about 10 cm. In order to divide well the three rows that we are going to make to drill it lengthwise, we can use a cutout of the tube that we have and on a sheet we mark the entire inside part and we fold this in half and again in half and in the case that we would like to make the top one we already have all the angles, to mark it on the tube that we have at the back and since today we are going to use this one, only these three are the ones that are going to serve us, I mark on one side where it ends, on the other and then here below.
And now all the lines will be well marked, to start making the perforations. And here what I do is with a tape, I put a thread to take it to the other end, so later I can mark all the perforations well. We leave the 10 centimeters, from the top, free for us to make the first perforation, the next one we are going to do at 20 cm, leaving this distance and thus we are going to separate every 20 cm, in the row that we have on one side and in the one on the other side and in the central row, if in the other we mark at 10 and at 30 cm in this one we are going to mark at 20 cm, so that we have a plant here, the other interspersed, the other the same height as the one back here, so we will ensure that the plants are well interspersed, so that it receives more light.
And we are going to use this type of 45 degree curves, one of the great advantages it has is that we are not going to use pots, because this way we will be able to leave the entire stem with the roots in the center of the main tube, so that when the water falls they are feeding and thus can grow well. And now we are going to make all the perforations with a cup drill, here what I am going to recommend is to try to find the diameter as close as possible, I am not going to recommend that it be a little larger, because otherwise when we put it in, it will be very loose and it will be more difficult to glue it well. We can remove these strips now, because everything was well marked and here at first, first slowly and then I recommend making circular movements, more than anything so that these pieces of PVC pipe do not remain too deep inside.
And in each of the rows I made five holes, in the one in the center and in the one on the other side as well, but at the end of everything, in the two of the ends, in this one and the one on the other side, I made a hole that will be approximately 15 cm from this central one, more than anything to take advantage of the space and be able to put one more plant, because if this tube is going to be here at the bottom of the bucket, we would have this hole very close to the lid, so we can take advantage of it. For each of these perforations we are going to put the curves, but one of them of the problems that we can have if we leave this tube completely, this long is that at the moment in which we are putting it, look what happens, more than anything in the two lateral perforations, when they overlap, if we leave them this long as they are, the problem that we are going to have is that once we put the plants through the perforations, they are not going to be in good contact with all the water that is going to come from above and this is going to mean that the plants cannot grow well, so what I'm going to tell you What I recommend is that we take out about 2 to 3 cm of length from this part of the inside of the curve, so that they do not overlap inside the tube, here I made a 2. 5 cm cut and look how they look, much more space inside and this way we will prevent the tubes from overlapping and we will leave all the roots well exposed for all the rain with nutrients that will come from above, the same will make it easier for this entire row that will go in the center.
So we are going to have all the roots very concentrated here in the middle so that they can extract all the nutrients from the water. And in this case I am going to recommend that the curves fit very tight, so that they do not move, because at the moment in which the plant takes out the roots, if this is too loose, it is very likely that the plants will end up falling and it is very important that the entire center of the tube is always very clean, that we can see to the bottom, so that this ensures that the water with nutrients will reach from above to below everything. And so that it is very firm, I am going to recommend that you glue it with this special glue that comes for PVC pipes, so that they are much firmer and can support larger plants.
And before gluing it, I am going to recommend that you align it well, so that the plants can develop better. And to make this whole system work, in this particular case, we have to look for a pump, one of those used for aquariums, which will go inside the bucket and it is important that this pump is capable of lifting at least 1. 5 meters, which is the length of this tube that we are using so that later when the water reaches up here through a hose it can fall in the form of drops, as if it were rain and thus all the nutrients will be able to be absorbed by the roots of the plants.
On the other hand, it is very important that the hoses we use for water circulation are opaque and not transparent, so that we do not have algae growth. And another important thing that I failed to say is that the pipe that we are going to use, for any hydroponics system that we put together, I will always recommend that it be white, because if we make it black, for example, this attracts a lot of the sun and will raise a lot of temperature inside where we are going to have all the roots of the plants. In order to achieve a good distribution of the water, up here we have to put some type of container, perforated to try to generate rain.
And in this case today we are going to do it with a pot and it is important that it fits well at the top, because now we are going to have to make two holes, one in the center, to pass the entire hose, which is where the water will come from, and then many lateral holes, so that that water falls in the form of rain through the base of the pot and wets as many roots as possible. The first will be well in the center and trying to make it a little smaller than the diameter of the hose, where the water will come from, so that it is very tight. And then in a geometric way, we are going to make many holes, so that all the water falls like rain, thus we wet all the roots of the plants.
I'm going to make the central one with a wick, because what I want to look for is that the hose fits like this, that it takes a little effort for it to remain like this at the top. And I'm going to drill the rest with some hot nails, to make it faster. Here I am going to recommend, in this lower part, that you put a little silicone to make sure that the hose sticks well.
And we are going to do the same inside so that the pot is very firm and attached to this entire hose. This entire bottom part is going to be the one that is going to be inside the bucket, more or less 10 or 15 cm from the base, you will make some holes in it. so that the water when it falls can come out and through the pump it can be better aerated.
And so that later, so that this whole tube remains very firm at the bottom of the bucket, I am going to use one of these lids, what I did was heat it a little here, because at the bottom of the bucket it is raised and so once you heat it here you rest it on the bottom for a little while until it takes the shape and this will allow us to keep it firmly fixed when we glue it. But to make it stick well, I am going to recommend that you sand it, so that the glue grips better and we are also going to do it on the bottom of the bucket, a little silicone and we are going to stick this here well on the bottom, and to help it stick well, I am going to leave a brick, very heavy, until tomorrow. Because it is important that all that base is well glued.
so that when we put the entire column, the bottom part does not move and is very firm with the lid that we put on the bottom. For the cover we are going to make a central hole, always taking into account that it fits well in the center to fix this entire part of the tube. And what I will always recommend is that you cut a very small ring to have the exact measurements, so with this, we align it so that it fits well in the center and we are going to mark the internal contour of the ring, we are not going to do it on the outside, because this way by doing it inside here, we are going to make this entire cut a little smaller than the width of the entire tube, and so when we put it on it will fit well under pressure.
First we are going to test how this pot, which we prepared with the hose, draws water to make sure that it thoroughly wets the entire central part of the tube, which is where the roots will be. We are going to test this entire system, more than anything to make sure that it draws a good amount of water through all the holes we made in the central part of the tube, where all the roots will be , we connect and wait for the water to come out. And this is what we have to achieve, look, this ensures that the entire center will be well moistened with the nutrient solution, so that these roots can extract the nutrients and the plants can continue growing.
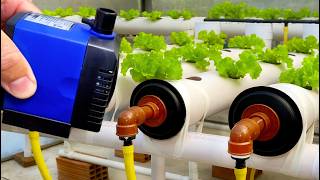
Although now it throws a lot of water, as I go up to more or less one and a half meters, notice how the amount of water it throws decreases, this will be more than enough, so that all the roots that are in the center of the tube can be well wetted . But before assembling the hose, first we are going to put the lid that we assembled, almost reaching up here, which would be the height of the bucket, notice that it fits well under pressure and this is what we have to look for, but we are not going to take the hose out down here, because at the bottom of the bucket we put the lid so that the column does not move, so I am going to recommend that you use these perforations that we made up here, so that it has better water recirculation. And after this, we are going to hook it directly with the pump at the bottom of everything.
And I am going to put this pump on the side and not in the center, because as it is a pump that is over 1. 5 m high, it does not fit in this tube, but if you manage to get one that is a little smaller, it will fit much better. And now I make the connection to the pump.
And we are going to fit the tube into the lid that we put on the bottom, to make sure that it is very firm and does not move. And we are going to fill it with water almost to the top, so that the pump generates good circulation. And now we will only have to start it, but we will have to make sure that at the top we have a good flow, when the water comes out, and one of the great advantages.
What this system has is that we will be able to grow, for example, basil plants and we will be able to make them branch, so that we have greater production, in a small space. But before showing you how to put the plants. I wanted to give you some super important advice, above I am always going to recommend that you cover it, to prevent any remains of leaves or sticks from falling that could cover the perforations of the pot, because if all the water is covered with the nutrient solution it can start to fall and we will end up losing it, but it is also important that all the water remains in the system, so that the pump never lacks water.
I am going to recommend making a hole in this upper part of the pot, the hose reaches here so that if the level rises the water will come out through here. We are going to connect one hose at the bottom and the other up here, because if this gets clogged here the water will fall. By the way, I'm going to put paper, up here , to cover the perforations, the water level is going to start to increase and if we didn't have an emergency exit, it is very likely that all this water will end up falling, we will end up losing water from the entire system, what we do is we return it, taking into account that we are going to check this often, because if now the water comes from this side, it will not wet all the central roots of the plant well and this will cause some to end up weakening, but at least this way we will ensure that we do not end up losing all this water with nutrients.
That's why we either leave it well covered or check it from time to time to prevent it from getting covered. And as for the nutrient solutions, I use this one, which would be the one they call A and the one they call B, depending on where you buy it, they will tell you what amount to put per liter capacity of water in the tank we are going to use. And in this case I put them up here, if you want to know more about this whole topic of formulations, what type of nutrients they need, the pH, the electrical conductivity, for hydroponics systems, down here I'm going to leave you a link to the video I made and if not you'll find it up here.
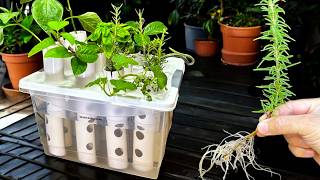
Look here, we already see all the water that reaches the curve, this is one of the great advantages of using this system because, we are going to have the water practically at this level, so when we put the plants immediately all the roots will be well in contact and in all this other part that I am missing, I am going to put these purple albacas, we can put two to three plants, to achieve a greater number of leaves faster and look, the roots are already in contact with the water, it would be working there. without any problem, this whole system. But what I am going to advise you, so that the stems are not so loose and that they end up falling off, we are going to secure it with this synthetic fiber, around the small stems.
And in this way we are going to ensure that the plants are well up, so that they can develop well. And another piece of advice that I am going to give you, for when you grow basils, for example, is that you cut them like this, below two nodes that we have, because this later, look what it is going to do, impressive roots, we are going to be able to have this, when we make the cut in the central branch, the two lateral branches that follow below resume all the growth, and thus we are going to double the entire production in this case of basil plants. I send you a big greeting.
Related Videos
15:17
💧All the Secrets to Make Easy Hydroponics...
MiradasBiologicas
192,101 views
![DIY Hydroponics | Aeroponics Garden Tower Build | Part 2 - [4 Tower Build]](https://img.youtube.com/vi/mimElkAepYY/mqdefault.jpg)
26:20
DIY Hydroponics | Aeroponics Garden Tower ...
Chris Loh
1,817,275 views

28:07
❥ Explosión de vida: el diente de león al ...
aPreciosdeRemate‼ Tu Tienda en Línea Colombia 🛒🥇
14 views
13:58
💧The Machine that ROOTS 10 Times Faster
MiradasBiologicas
550,203 views
18:32
💧How to make hydroponic system at home
MiradasBiologicas
1,036,082 views

24:31
The process of a Korean scientist growing ...
king process
3,134,848 views
16:11
Billions of people don't know this secret�...
Creation Secret
145,792 views
12:50
No watering - No soil - Unique method of g...
EY - Gardening
558,237 views

14:33
Hanging Garden Growing Lettuce Without Wat...
Balcony & Garden
12,777,128 views
26:55
DIY Hydroponics Garden Tower Build | Less ...
Chris Loh
2,039,551 views
58:20
How To Grow Tomatoes WITHOUT Watering & Ge...
Balcony Garden Ideas
1,232,857 views

30:19
How to Grow Strawberries at Home Without W...
Terrace Garden
78,044 views
8:31
💧 Make the Most of Your Hydroponics with ...
MiradasBiologicas
40,614 views

14:32
Growing Strawberries in Plastic Bottles - ...
Balcony & Garden
4,098,652 views

1:01:10
TOP 65 INCREDIBLE INVENTIONS YOU HAVE NOT ...
TECH HUB
15,524 views
14:02
Farmer taught how to DIY aquarium and gree...
No1 IDEAS
8,094,111 views

10:23
Raised Garden Beds Are So Yesterday!
HAXMAN
2,986,848 views
22:23
Build Your Own Hydroponic Grow Tower In 30...
Zen Garden Oasis
149,385 views
22:33
💧How to Build an Easy Wall-Mounted Hydrop...
MiradasBiologicas
106,135 views

25:51
THOUSANDS of STRAWBERRY Plants in 7 Days! ...
Huerta Forestal De Jaime
486,495 views