5-Minute Scalping Strategy Revealed: Easy and Profitable for Forex, Stocks & Crypto Beginners
163.2k views6659 WordsCopy TextShare
Pro Trading School
Unlock the power of a 5-minute scalping strategy that’s easy, effective, and highly profitable! In t...
Video Transcript:
hey Traders welcome back to the channel today we're diving into one of the most powerful scalping strategies top Traders use to stay ahead of the game whether you're a Season Pro or just starting out this strategy will transform the way you trade in this video you're going to learn exactly how to decode how trading machines and algorithms move the market the hidden patterns that big institutions leave behind once you know how to recognize these patterns you'll be able to spot institutional trades as they happen and take advantage of the same opportunities but here's where it
gets even better I'll be sharing four costly mistakes I made when I was starting out these mistakes set me back over $13,500 and I'm giving you the blueprint to avoid them so you can fast track your own success without paying the same price and the beauty of this strategy it's designed for the 5 minute time frame so it's fast effective and doesn't require top- down analysis and it works across all markets if you commit to mastering this strategy and learning from my experience you can transform your trading approach and see Real Results stick with me
because what you're about to learn could be a GameChanger all right let's dive into the foundation of this strategy supply and demand zones a supply zone is a price area where selling pressure is strong enough to stop the price from going higher this Zone often appears after a rally or uptrend when big players like institutions or Banks start selling to take profits as a result the market reacts by dropping from this level a demand zone is a price area where buying pressure is strong enough to stop the price from going lower this Zone often forms
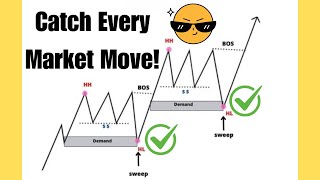
after a decline where big players step in to buy pushing the price back up a spot where the market is likely to move you need to recognize that supply and demand zones show up in four distinct patterns mastering these patterns will help you identify when and where the market is most likely to reverse or continue its Trend let me introduce you to the drop base rally a powerful bullish reversal pattern this isn't just any price action it's the footprint of smart money at work here's how it goes the price drops this is the market pulling
back often shaking out weak hands then comes the base a consolidation phase where buyers start quietly accumulating but here's where the magic happens this isn't just consolidation it's manipulation the smart money is gathering strength finally we see the explosive rally buyers take control driving the market upward what's happening here is more than just a price move it's a strategic play by institutions they push the market down accumulate positions at the base manipulate the market to get the best price and then let the rally fly now let's look at a real chart example of this drop
base rally pattern as you can see the drop isn't just a random move it's a deliberate smart money play a liquidity grab designed to trigger stop losses and shake out retail Traders next comes the Bas this is where accumulation happens smart money quietly builds their buy positions here preparing for the next big move while everyone else is uncertain during the base there's often manipulation they create false signals to trick retail Traders into thinking the market might drop further finally we get the rally a strong upward move as smart money takes control pushing the price higher
this drop base rally pattern marks a key demand Zone a spot where smart money left their Footprints as a scalper you know this zone is a reference point for in institions when the market revisits this area there's a strong chance it will explode higher again because when smart money bought here they didn't do it all at once they bought gradually to avoid spiking the market when the price comes back to this Zone institutions have limit orders waiting and Retail traders who try to jump in too soon often Place their stop losses nearby the result the
market sweeps liquidity triggering those stops and then surging upward exactly the move we want to scalpers but this is just 1% of the whole strategy keep watching because the next part will really show you how to leverage this pattern for consistent profits now let's switch to the rally Bas drop a classic bearish reversal pattern the market rallies upward hits a base where institutions start selling and then drops sharply this base forms the supply Zone where smart money leaves its Footprints creating a high probability area for future price action when the price revisits this Zone institutions
already have their limit orders w waiting and the market often sweeps liquidity from retail traders who have placed their stop losses just above the Zone this triggers a strong drop exactly the move we want to catch as scalpers now looking at this real chart we see the rally Bas drop pattern in action first there's a rally a move driven by smart money as the price pushes higher then the market hits a base this is where institutional Traders begin offloading their positions creating a supply Zone what happens next the price makes a sharp drop but this
is where we need to stay patient as scalpers we wait for the market to retest the supply Zone this is the moment smart money might come back in when the market revisits this Zone it's our chance to enter quickly and catch the next downward move the key here is the retest that's where we can get in without needing to chase the move once we're in we look to exit fast locking in profits before the market fully reacts now let me show you something truly powerful in this same chart example we can see the market creating
both a drop based rally and a rally based drop a perfect illustration of how smart money operates first the market forms a drop base rally creating a demand Zone as the market approaches this Zone it sweeps liquidity and then moves upwards this is a classic smart money move taking out retail Traders before driving the price in their intended Direction later in the same chart we see the market form a rally based drop establishing a supply Zone once again as the market market returns to this Zone it sweeps liquidity and moves downwards trapping retail traders in
the process What's Happening Here is no accident these are trading machines algorithms programmed to trade this way by mastering these patterns you're essentially decoding how the machines and algorithms trade the beauty of this strategy is that it's robotic these moves repeat frequently in the market offering endless opportunities so by identifying where smart money enters and exits you can start taking the same trades and trade like a pro now don't take any action just yet this is just the basics I'm laying the foundation but we're going to go much deeper into this strategy so keep watching
Because by the end you'll know exactly how to use this setup to its full potential and make the most out of these Market moves next let's look at the rally Bas rally pattern this one's all about bullish continuation here's what we're looking for the price makes a strong rally and instead of reversing it forms a base but this time the base isn't signaling a drop it's just a pause before the price continues its upward move this base shows us where institutions are building up more buying power and when the price pushes up again it confirms
that buyers are still in control looking at this real chart we can see the rally base rally pattern play out perfectly first there's a strong rally smart money and institutions are driving the price upward this is a clear sign that they're stepping in and taking control of the market but here's where psychology gets interesting the market pauses forming a base for retail Traders this might look like indecision or a sign that momentum is fading but for those in the know it's a completely different story this base is where institutions are quietly adding to their positions
preparing for the next leg up they're accumulating more buying power while keeping the market calm what we're looking for here is the next move the second rally when the price breaks out of the base that's our confirmation that buyers led by smart money are still in control as scalpers our focus is to catch the move when the price returns to retest the base that's where we can enter quickly ride the continuation and exit just as fast with profits in hand finally let's break down the drop base drop first we have a clear drop the market
is in a downtrend and sellers are dominating the price then pauses briefly forming a base this isn't a sign of a reversal but rather it's a moment where institutions are setting up for the next wave of selling what comes next another sharp drop as the selling momentum resumes this base forms a supply Zone a key level where institutions have offloaded their positions and are ready for more downside pressure now let's move to a real chart to see the drop Bas Drop In Action first we see a strong downward move followed by a pause where a
base form forms this base is where institutions are quietly Gathering their sell orders after this accumulation phase the market drops sharply again smart money doesn't sell everything at once if they did they disrupt the market instead they sell gradually allowing the market to accumulate liquidity then they manipulate retail Traders and sell again forming this drop Bas drop pattern a clear smart money footprint as scalpers our goal is to spot this Zone and wait for the market to come back and retest it once that happens we can look to enter but it's not as simple as
it looks there are more details and conditions you need to be aware of and I'll explain those next in this video now that you know how to spot supply and demand zones let's take it a step further and make sure you're only focusing on the best zones for your scalping strategy not all zones are worth trading some are strong others are weak and won't deliver the quick profits we're aiming for the key to scalping is speed so you need to know how to filter out the weak zones and focus only on the ones that can
deliver fast reliable moves based on my experience there are four critical factors the first factor is the candle size of the move big institutions leave Footprints and one of the most obvious signs is the size of the candles if the candles are large and consistent in color it's a strong signal that smart money is behind the move on the other hand if the candles are small mixed and full of Wicks the move likely lacks institutional power so it's best to skip it the second factor is the freshness of the Zone only focus on zones that
have never been tested the first test is your entry when trading the 5-minute time frames you'll come across a lot of zones and this filter is essential fresh zones tend to respond positively leading to profitable trades once a Zone has been hit even once it loses strength so it's best to avoid zones that have already been tested the third factor is the breakout of structure when identifying strong Supply or demand Zones look for moves that break through key levels of Market structure such as previous highs or lows a breakout of structure signals that smart money
is behind the move as they push the market Beyond these levels to trap retail Traders and Trigger their stop losses when the market breaks through structure it's not just a random move it's a clear sign that institutions are driving the price action creating a strong Zone these breakouts indicate a shift in market dynamics and they provide you with high probability trading opportunities the fourth and final factor is the risk to reward ratio this is critical don't trade a Zone unless it offers at least a 3 to1 risk to reward ratio if the potential profit isn't
at least three times your risk it's best to skip the trade even if the Zone looks strong without a solid risk to reward ratio you'll lose in the long run now that we have covered the key factors for identifying a high probability Supply or demand Zone such as candle size freshness of the Zone breakout of structure and a 3:1 reward to risk ratio keep these in mind as we move forward these factors are the foundation of finding the best trading opportunities so let's apply them to some real chart examples let's dive into this real chart
example as you can see we have a demand Zone forming here now let's break it down and see if this Zone meets the criteria of a high quality zone or if it's one we should avoid notice how we have large strong candles moving in the same direction this is a clear sign that institutional money is behind this move big candles especially those with little or no Wicks indicate a significant volume of buying power exactly what we want to see in a high probability zone now let's check the freshness of this Zone you'll notice that this
demand Zone has never been tested before it's a fresh Zone which means it's more likely to produce a strong reaction when the price comes back to it as we discussed earlier the first time a zone is tested is often the most powerful entry and that's what we're aiming for next look at how this move has broken the previous Market structure see how it broke above a key resistance level creating new highs this breakout signals that smart money was involved in pushing the market higher trapping retail Traders along the way this is a classic sign of
a powerful demand Zone formed by institutional buying finally let's calculate the risk to reward ratio from this entry point we can see that the Zone offers a potential 3:1 risk to to reward setup which is exactly what we need this ensures that even if the trade doesn't win every time we're still profitable in the long run by sticking to high probability zones with a strong reward to risk ratio based on the four factors we just analyzed this Zone clearly qualifies as a high probability demand Zone it meets all the key criteria strong candles freshness of
the Zone a breakout of structure and the right risk to reward ratio so yes this Zone should be taken seriously but before you rush off to trade it remember we're still in the process of filtering this is just the foundation there are more critical conditions to be respected before you take action so don't stop watching now there's much more to come that will help ensure you only trade the best zones with confidence now let's look at another chart example this time a supply Zone we'll quickly run through the four factors to see if it qualifies
as a high probability Zone first check the candle size this shows strong selling pressure likely driven by institutional money next the zone is untested it's fresh no previous touches which means the first time the price revisits this level we're likely to see a strong reaction look at how the move breaks below a key support level this is a breakout of structure a clear sign that smart money is in control pushing the market lower and trapping retail Traders finally the risk to reward ratio offers at least a 3:1 meaning we have a good chance of profiting
even if the win rate is lower based on these four factors as you can see this Supply Zone meets all the criteria of a quality Supply Zone and should definitely be taken into consideration now let's look at this chart where we've spotted a demand Zone at first glance it seems promising but as we apply the four key factors you'll see why this Zone should be ignored first the candles making up the move that forms this zone are large and consistent this is a strong sign that institutional money might be involved so we're off to a
good start the zone is fresh meaning it hasn't been tested before that's another positive and it suggests that we may see a strong reaction when the price revisits the area next the move does break through the previous structure breaking above a resistance level which is what we want to see however this is where the problem Lies when we calculate the risk to reward ratio it doesn't meet our 3:1 minimum the potential reward is simply not worth the risk which makes this trade too risky to take even though this demand Zone meets three out of the
four criteria it lacks The crucial risk to reward ratio and in our scalping trading strategy if just one Criterion is missing the Zone should be ignored remember we're only interested in high probability setups that offer us the best chance for success but don't worry in the 5minute time frame You'll Always Find plenty of zones to choose from the key is to be patient and disciplined waiting for the right setup all right now that you know how to identify supply and demand patterns and how to filter out the highquality zones you're already ahead of the game
let's move to the next step waiting for what I call the second confirmation the liquidity sweep let me break it down for you a liquidity sweep is a tactic used by market makers to trap retail Traders trigger their stop losses and fill their limit orders here's how it works the market moves up and breaks a resistance level then pulls back to retest that same level which has now turned into support this level becomes a liquidity area holding lots of stop losses and pending limit orders what do market makers do they push the market to sweep
that liquidity by breaking just below the support level this triggers all the stop losses fills the limit orders and then here's the key part reverses the market back up it's a classic move by smart money to clear out the retail Traders and get the best entry and this is exactly what happens when they approach Supply or demand zones as well now let's take this back to the demand Zone we've identified on our chart we already know it's a high probability Zone but before we jump in we need to wait for that liquidity sweep to happen
because this is exactly how smart money operates and we want to be on their side not the side of the retail traders who get trapped what do we need to see we should look for a breakout of the demand Zone where the price dips below the zone to trigger stop losses and then a close back above the demand Zone this is the liquidity sweep it tells us that smart money has absorbed the liquidity and is now ready to push the price higher when you see a liquidity sweep at a demand Zone that's to signal that
institutions are paying attention to this level it shows that smart money is getting ready to take action and we need to be prepared now that we've covered the two key components of our strategy identifying highquality supply and demand zones and waiting for a liquidity sweep it's time to move to the next crucial step price action confirmation when a liquidity sweep happens it leaves a footprint in the form of specific Candlestick patterns for this strategy we focus on two simple price action confirmation signals the pin bar and the tailed bar tailed bars can also appear as
dois offering the same confirmation let's start with the pinbar a powerful signal that gives us insight into what smart money is doing a pin bar is a Candlestick pattern with a small body and a long Wick the body shows where the price opened and closed during the time frame while the tail represents the range the price moved during that period when a pin bar forms it signals that the market attempted to move in One Direction but but was quickly rejected by strong forces in the opposite direction this rejection tells us that the initial move was
likely false and the real move is about to go in the opposite direction when a bullish pin bar forms at a demand Zone it's an important signal here's what happens smart money pushes the price down into the demand Zone to sweep liquidity triggering stop losses or filling limit orders from retail Traders but the buyers step in quickly rejecting the lower prices which forms the long tail of the pin bar this tells us that the market has tested the demand Zone absorbed the selling pressure and now buyers are taking control the small body of the pin
bar shows that the price is likely to move upward from this point this is our confirmation that smart money is interested in this Zone making it a great opportunity to enter a Buy trade let's take a look at the bearish version of a pin bar when a bearish pin bar forms at a supply Zone the psychology is reversed smart money pushes the price up into the supply Zone again triggering liquidity sweeps by breaking through stop losses or filling limit orders however this time the sellers step in and reject the higher prices the long Wick shows
that the price was rejected from the supply Zone indicating a likely downward reversal this tells us that sellers are now in control making it a strong signal to enter a sell trade now let's move to the second liquidity sweep signal the tailed bar a tailed bar is a Candlestick pattern where the body body is small but the key feature is the long tail or Wick extending from one side of the candle this tail represents the area where price was rejected indicating that smart money stepped in to reverse the move after the liquidity sweep the long
tail shows where the market tested liquidity but quickly reversed leaving that tail behind we can also consider a dogee as a type of tailed bar using it as a confirmation signal in the same way let's start with a tailed bar at a demand Zone when the market moves mes down into a demand zone smart money often pushes the price below the zone to trigger stop losses and absorb liquidity the long tale of the tailed bar shows us that after the liquidity sweep buyers stepped in aggressively rejecting the lower price the body of the tailed bar
closes back above or inside the demand Zone which signals that the demand zone is being respected by smart money the long tail tells us that all the selling pressure has been absorbed and the market is now ready to move upward this tailed bar acts as a confirmation to enter a Buy trade after the liquidity sweep as it shows that smart money has rejected lower prices now let's look at a tailed bar at a supply Zone in this case smart money pushes the price above the supply Zone triggering stop losses and filling by orders after the
liquidity sweep the long tail shows that sellers quickly stepped in and rejected the higher prices the body of the tailed bar closes below or inside the supply Zone signaling that smart money has rejected Ed the higher price level and the market is likely to move downward this is a clear sign to enter a sell trade after the liquidity sweep as the long taale confirms that the price was rejected and the market is set to reverse all right now that we've covered the three key components of our strategy liquidity areas like supply and demand zones liquidity
sweeps and price action signals all right let me walk you through this real chart example to show you exactly how to trade this powerful scalping strategy we've identified a clear Demand on the chart now before placing a trade we need to qualify the zone to ensure it's worth trading let's break it down let's look at the candle size the candles that form the zone are large showing strong momentum and indicating institutional involvement a good sign for a high probability trade now let's check the freshness of the Zone this zone is fresh meaning it hasn't been
tested before since it's the first time the market r visits this Zone it has a higher chance of reacting strongly next let's confirm the breakout of structure here we can see that the market broke through a previous resistance level which signals that smart money is likely in control adding more strength to the Zone finally let's evaluate the risk to reward ratio The Zone offers a favorable 3:1 risk to reward ratio which is exactly what we want in a quality trade now that we've qualified The Zone let's see what happens when the market approaches it here's
what we see a liquidity sweep smart money drives the price below the demand Zone triggering retail Traders stop losses and filling limit orders then the market closes back inside the Zone forming a Pinar pattern the pin bar serves as our confirmation signal here's what to do place your entry at the close of the pin bar set your stop loss just below the pin bar Wick Target the next resistance level as your take profit once these are set use the set and forget approach either the trade will hit your target or stop loss with no need
to constantly monitor take a look at what happened next the market moved exactly as we expected going in the targeted Direction confirm in the strength of this strategy all right observe this chart example we have identified a supply Zone this zone is marked by a strong clean downward move with large red candles moving away from it although there is a small opposing candle it failed to change the direction and the market continued downward strongly this sharp drop suggests significant selling activity by institutions creating an imbalance and establishing a reliable Supply Zone before taking a trade
let's go through the checklist to confirm this Supply Zone's potential first observe the candles that form the move down they are large showing strong bearish momentum indicating institutional involvement a positive sign that this Zone could hold when the market revisits it this Supply zone is fresh it has not been tested since it formed a fresh Zone often responds more strongly because it hasn't absorbed any orders yet making it ideal for a potential trade as the price moved down from the supply Zone it broke through previous demand Zone this is a strong indication that smart money
is in control adding more significance to this Zone additionally this setup offers a favorable 3:1 risk to reward ratio this aligns perfectly with our goal providing a limited risk and high reward potential as the price returns to the supply Zone we monitor closely for a liquidity sweep here's what occurs smart money briefly pushes the price above the supply Zone sweeping liquidity by triggering retail Traders stop losses the price then closes back below the Zone forming a bearish pin bar this pin bar acts as our confirmation signal indicating that the supply zone is still valid and
a market reversal is likely here's how to execute the trade place the entry at the close of the bearish pin bar once the liquidity sweep is confirmed position the stop loss just above the pin Bar's Wick to control risk set set the take-profit target at the next support level with everything in place apply the set and forget approach allow the trade to progress without constant monitoring the trade will either reach the Target or hit the stop loss making this strategy straightforward and stress free as shown here by applying these rules the market reached the target
directly this strategy is easy simple and highly profitable let's move to another chart example here we're looking at a supply Zone before jumping into a trade let's make sure this Zone qualifies as a high probability setup the candles dropping from the zone are large and bearish showing strong selling momentum this suggests smart money involvement the zone is fresh and hasn't been retested since it Formed fresh zones often lead to strong reactions as the price moved down from this Zone it broke a previous support level this confirms that institutions likely drove the market we have a
favorable 3:1 risk to reward ratio which is ideal for this setup now that the zone is is qualified let's see what happens as the price revisits the price briefly moves above the supply Zone sweeping liquidity and triggering Retail stop losses right after a dogey tailed bar forms confirming the reversal the Doge's long upper tail shows that sellers stepped in rejecting higher prices this tells us smart money is absorbing buying pressure preparing for a move down now you can place your entry at the close of the dogee tailed bar set your stop loss just above the
high of the tail for your take profit Target the next support level use the set and forget approach and allow the trade to unfold without constant monitoring after the dogey tailed bar confirmation the market moved downward as expected hitting our Target all right before we move on let's talk about something just as important as learning the strategy itself the mistakes to avoid when trading this powerful scalping strategy now you've got one of the most effective strategies in your hands but here's the reality without paying attention to certain mistakes even the best strategy won't help you
make consistent money in this real chart example we've identified a strong demand Zone The Zone meets all the necessary criteria large candle size it's fresh there's a breakout of structure and the risk to reward ratio is favorable you place your Buy trade with the stop loss set just below the demand Zone the market then moves lower dipping below the demand Zone and triggering your stop loss at this point it's easy to feel frustrated but this could simply be a stop hunt by smart money to sweep liquidity so instead of reacting emotionally let's look at what
happens next after your stop- loss is triggered the market returns to the demand Zone and closes above it this is an important moment it signals another opportunity for you to reenter the market the initial move down was likely just a liquidity grab to trigger retail Traders stops now here's what you do stay calm accept that first loss and reenter the trade this time you place your stop loss just below the low of the demand Zone and Target the next level this time the market moves in the targeted Direction and hits your profit Target by understanding
how the market tries to play on your nerves with these moves you've turned a potential loss into a profitable trade all right let me walk you through another common trading mistake that many Traders make when using this strong scalping strategy so you're watching the charts and you spot the perfect Supply Zone forming it looks like the ideal setup but then life happens maybe your wife asks you to do something or it's time to take your kid to school suddenly you feel that fear of missing out you don't want to miss this opportunity so you rush
to place a limit order thinking the market will definitely respect the supply Zone you step away handle your tasks and when you come back you're frustrated the trade didn't work out your stop- loss was hit or the market didn't react the way you expected this situation is more common than you might think and it's a trap many Traders fall into here's the truth entering that trade because you feared missing out was a mistake the supply zone is only one part of the strategy who said the market would respect that zone if you trade like this
without waiting for all the conditions to be met you're still trading like an amateur and let's be honest that's more like gambling you might think you're following the strategy but in reality you're rushing the process you're not respecting the market and when you don't respect the market the market won't respect you so how do you deal with this fear of missing out when using a powerful scalping strategy like this first you need to shift your mindset the market is full of opportunities if you miss this one no worries in the next 5 minutes 10 minutes
or even an hour there will be another possibly even better opportunity remember you're scalping on the 5-minute time frame and you can apply this strategy across all financial markets finding opportunities is never a problem let me share a pro tip with you the real reason reason for your struggles in trading or in life comes down to you many Traders especially beginners tend to blame their broker the market or even circumstances for their trading losses but here's the truth the problem isn't external it's within you the Real Enemy you're dealing with is your ego let me
walk you through a scenario to make this Crystal Clear you've identified a powerful demand Zone you see a liquidity sweep and you're confident that the market is about to turn in your favor so you enter the trade and you feel excited just like the first day you went out with your girlfriend the market starts moving up slightly everything seems perfect you're already Imagining the profits but then suddenly the market begins to reverse it starts going against you now here's where the ego kicks in instead of accepting the possibility that the trade might not work you
decide I can't lose this trade so what do you do you move your stop- loss further and further thinking the market will turn around any second but the market keeps going against you you keep adjusting the stop loss until you're deep in the red maybe even getting a margin call this is one of the biggest mistakes beginner Traders make they trade out of ego refusing to accept that losing a trade is part of the game let me share another common trading mistake that can derail your progress if you're not careful imagine this you spot a
promising trading opportunity you've done your analysis everything checks out and you decide to take the trade but unfortunately it ends in a loss let's say you're down $100 that's manageable depending on your Capital the point is you followed the process but this trade didn't work out a bit frustrated you move on and find another opportunity feeling confident you place your trade and set your stop loss but again it's a loss now you're down $200 here's where the fear of pulling the trigger starts to kick in you begin to doubt the process after two losses in
a row you spot another perfect setup but now your mind starts saying what if I lose again I can't afford another $100 loss this is where many beginners freeze despite seeing a strong setup you hesitate too afraid to take the risk of another loss but let's imagine you do push past that fear and take the third trade this time the market moves exactly as you expected the price hits your target giving you a 7.6 to1 reward to risk ratio that one trade Nets you 7 $60 enough to cover the previous $200 in losses and still
leave you with a $560 profit for the day here's what you need to understand trading is a marathon not a Sprint you're not here to win every single trade you're here to play the long game if you respect the conditions of a high probability trade and you stick to a solid 3:1 reward to risk ratio you don't need to win every trade to be profitable let's dive into how a 3:1 reward to risk ratio can be the key to long-term profitability even when most of your trades end in losses let's take the worst scenario that
could happen here's what that looks like step by step imagine you have a $10,000 trading account now to protect your Capital you decide to risk only 1% of your account per trade that means On Any Given trade you're risking $100 we'll break this down in terms of Pips for more clarity suppose you're risking 10 pits per trade and with each pit being worth $10 that equals the $100 you're risking so if the trade goes against you and you lose those 10 Pips you lose $100 next your strategy is to aim for three times the amount
you're risking so while you're risking 10 Pips your target for each winning trade is 30 Pips which equals $300 that's the essence of the 3:1 reward to risk ratio for every dollar you risk you aim to make $3 in return let's assume you take 100 trades following this strategy now here's where the magic happens even if you lose 70 out of those 100 trades a 70% loss rate you can still be profitable let me break it down for you out of your 100 trades you lose 70 since you're risking $100 on each trade your total
loss is $7,000 at this point it might seem like you're in trouble but let's look at the winning trades now let's say you win the remaining 30 trades for each winning trade you make three times what you risked which which is $300 per trade your total profit from these 30 winning trades is $99,000 now subtract your total losses from your total profits even though you lost 70% of your trades you still walked away with a $2,000 profit the key takeaway here is that trading isn't about winning every trade it's about managing your reward to risk
ratio as long as you follow a strategy with a high reward compared to your risk you can lose most of your trades and still come out a winner the 3:1 reward to risk ratio works because it allows your winners to far outweigh your losses it's about staying disciplined accepting that losses are part of the process and letting your winners run thanks for watching Traders I hope this strategy gives you the edge you need to tackle the market with confidence remember the more you practice the better you'll get at spotting those high probability setups if you
found value in this video don't forget to hit the like button and subscribe so you don't miss out on future strategies and tips and if you have any questions or want to see more examples drop a comment below I'd love to hear from you until next time stay disciplined keep practicing and let's conquer the market together
Related Videos

27:55
I built an Omni-Directional Ball-Wheeled Bike
James Bruton
3,762,801 views
39:19
Support And Resistance Didn't Work Till I ...
Rayner Teo
2,037,416 views

1:03:43
Ansible 101 - Episode 1 - Introduction to ...
Jeff Geerling
582,064 views

24:05
My Incredibly Easy 1 Minute Scalping Strat...
Riley Coleman
280,943 views

57:50
How To Speak English When You Don't Know T...
EnglishAnyone
12,398 views

3:05:03
27 Years of Trading Knowledge in 3hrs and ...
Ross Cameron - Warrior Trading
344,247 views
22:42
ULTIMATE Scalping Course (For Beginner to ...
The Trading Geek
1,228,621 views

21:58
How I Nailed Trading with the MACD Indicat...
Ross Cameron - Warrior Trading
589,708 views

3:27:38
Pure "PRICE ACTION Mastery" Course🔥 | 3+ ...
Fortune Talks
2,120,069 views

1:18:50
I Found The Easiest Scalping Strategy - $2...
Riley Coleman
392,578 views
20:50
6 Trading Psychology Secrets: How I Overca...
Pro Trading School
27,633 views
23:21
Top Liquidity Sweep Trading Strategies for...
Pro Trading School
53,130 views

1:33:20
1 Atheist vs 25 Christians (feat. Alex O'C...
Jubilee
1,717,761 views

3:06:12
The Ultimate Day Trading Guide for 2025 (F...
Ross Cameron - Warrior Trading
206,418 views

30:19
I Never Shared This Scalping Trading Strat...
The Secret Mindset
221,672 views
44:00
Best RSI Indicator Trading Strategy - Wyse...
Wysetrade
2,909,079 views
18:39
4 GOLD Trading Strategies for Scalping, Da...
Pro Trading School
49,098 views
1:47:09
Master Class: Learn Day Trading in 2 Hours...
Riley Coleman
334,363 views

27:46
Only 1 In 100 Traders Knows This 1 Minute ...
The Secret Mindset
78,577 views

1:49:55
How To Speak Fluently In English About Alm...
EnglishAnyone
3,334,099 views