Beginners Guide to The BEST Lights for YouTube Videos
26.33k views2468 WordsCopy TextShare

Philip Lemoine
Cooking Creators Course: https://www.cookingcreators.com
$78 HPUSN Light Kit: https://amzn.to/4aGCP...
Video Transcript:
in this video I'm going to teach you everything you need to know about lights so that you can pick the best light for your YouTube videos I'll explain the different kinds of light bulbs and then break down the various styles of light kits that you might come across when you're searching online I'll teach you about light intensity and light quality I'll also discuss light diffusion and how to get nice soft even lighting I'll talk about accessories that you might also need to purchase give you tips on where to place your lights so you don't look
like you're telling a scary story and at the end I'll share an excellent $80 light kit that I would recommend if you're just starting out or on a budget although I shoot cooking videos these lights and principles will work for any YouTube Niche so the three common types of lights that you'll find in video light kits are going to be LEDs incandescent and compact fluorescent light bulbs lights also shine in different colors some lights glow more orangish yellow and some low more whitish blue this color is measured by a number called Kelvin and that ranges
between 1,000 and 10,000 the lower the number the more yellow the higher the number the more whitish blue incandescent lights are the most common and cheapest light bulbs they are not very energy efficient and can get pretty hot they normally glow a yellow or orange color around 3200 Kelvin or lower compact fluorescent light bulbs are a little more energy efficient and they last longer than incandescent bulbs you can also buy them in a range of colors from warm and yellow to cool and blue LED lights are going to be the most expensive of the three
options but they are the most energy efficient and give off little to no heat when they're on you can also buy them as a bulb or they're commonly seen on a panel they come in a range of Kelvin color temperatures as well as other colors in general like green blue or red at lights last for a very long time compared to the other two and it's the most efficient and flexible light and that's why I would recommend them over the others so if you're searching for video light kit on Amazon or online you're going to
see a ton of different options the four main light fixtures that you're going to see are going to be an LED ring lights LED panels LED cob lights and these softbox kits that have a light bulb so what's the difference well an LED ring light is the same thing as an LED panel light the difference is that one has LEDs placed around a ring and the others are grouped together in like a square or a rectangle the misconception about a ring light is that it's going to give you soft even lighting it can if it's
used correctly the way it's meant to be used is that you shoot through the ho of the ring and when you do that the light is going to shine evenly on you or whatever it is that you're filming this type of direct lighting is called Flat lighting and it creates the least amount of contrast or Shadows when using it to film yourself flat lighting will help hide any imperfections or wrinkles on your skin because you're more evenly lit from the light source being directly in front of you and on camera that's why a lot of
makeup artists use ring lights or this type of flat lighting for their makeup tutorials it also adds that cool round ring catch light on your eyes this style of flat lighting isn't necessarily a good or bad thing especially if that's a look you're going for but I personally like to use light to create shadows and give whenever I'm filming some sort of depth or contrast which creates a different feel or mood depending on how dramatic those Shadows are a majority of the people that buy a ring light are not doing makeup tutorials and are probably
not shooting through the hole which is the whole point of getting that style of flat Lighting in the first place typically they'll place the ring light off to the side of the camera now the ring light is just basically a round ring LED panel light and that's why a majority of people wonder why the ring light isn't creating that nice soft light that they thought they would get when they bought it soft light has a lot to do with diffusion and I'll talk more about that later if you take anything away from this video it
would be to just not buy a ring light so LED panel lights are basically what it sounds like it's a bunch of small LED lights that are spread across the surface or a panel they come in different shapes sizes and and the number of LED bulbs some can be plugged into the wall and some can be powered with a battery and some even have rechargeable batteries built right into them typically they're also dimmable so you can adjust the intensity of the light some Led panels might only shine one specific color temperature like the more blue
5600 Kelvin or daylight for example and you'll need to put a gel filter in front of the light to change the color or light temp to a more warm or yellow 3200 Kelvin Tong stick you might also see some that say by color which means that you can adjust the lights color temperature from Blue to Yellow to fit the scene or look that you're trying to create bolor lights are usually a little more expensive but I think it's worth it and you'll have the flexibility to quickly change your lights color temperature LED panel lights are
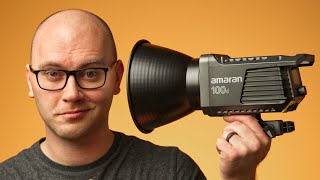
great because they're Compact and in most cases lightweight and they don't really get hot like incandescent light bulbs the downside though is that they don't offer much diffusion to create soft light but I'll talk more about that a little bit later another type of LED light you might come across are these caner looking things known as cob lights cob is an acronym for chip on board and it's basically a bunch of tiny LEDs packed onto a small surface cob lights are more brighter energy and heat efficient than LED panel lights just like panel lights they
are typically dimmable and you can find them in by color or just daylight and in most cases you can plug them into the wall but there are some that can be powered with a battery the main thing that I like about these style lights is that you have the ability to mount different modifiers directly onto them to change the shape or diffusion of the light you'll typically see a large soft box in front of them and these are the style of lights that I use to film all of my on camera talking and cooking Parts
cop lights can take up more space than panels but the soft boxes really help with creating even soft Lighting in your shots they can get much brighter but they could also get more expensive there are a ton of different brands out there at different price points the last lights that you might come across are these softbox light bulb setups they have a fixture that has a built-in reflector that pops open sort of like an umbrella and then you would screw in a light bulb into the socket and then cover the whole thing up with the
diffuser different kits come with different colors and brightness light bulb options what's cool is if you don't like the light bulbs that they came with you can always buy different ones online or Like Home Depot or something they also usually have a really short cable with an onoff switch built in so you might have to invest in an extension cord depending on the size of your kitchen and your whole Outlet situation these kits are generally pretty cheap but honestly I think it's a great beginner's light kit if you're just getting started part of this video
is one of over 80 video lessons in my cooking creators course I'll teach you everything there is to know about how to plan film and edit cooking videos with just your smartphone there's also modules teaching social media strategy to grow a following and a module talking about ways to monetize your recipes and get brand deals I have a link in the description if you're interested and if you stay till the end of this video I'll have a discount code on the screen that can save you an additional 20% off so the next thing to consider
when investing in a light is going to me the brightness or the intensity of that light this is typically measured by lumens and or Lux lumens measure the total amount of light emitted from the light source or the bulb Lux is the measurement of the total amount of light that falls onto the surface so a light bulb might say it has 2500 lumens but depending on how close or far or focused that light is from whatever it's lighting it can affect the intensity or Lux of that light when looking at specifications on a light typically
you'll find the Lux measurements based on distance from the light source for my amaran 200x lights it shows at 100% power it can get up to 6,700 Lux at 1 meter or 3 ft away which is super bright my smaller amaran 60x at 100% power puts out about 2,374 Lux at 1 M which is still very bright I usually use my smaller ammer 60x at around 60 to 80% power depending on what I'm filming and I'll run my 200x at about 40 to 60% in my kitchen so when shopping for a light I think anything
with around 2,000 Lux will be good but if you can afford a brighter light I'd say go for it it's better to have more light and not always need it than it would be to not have enough light and be stuck when you do need it another thing to consider is the c number of the light some light bulbs might GL a little magenta or a little green and because of that it could affect the colors in the video that you're capturing CRI stands for color render index and this is a measurement of how natural
colors look under an artificial light source when compared to sunlight CRI is measured from 0 to 100 and a CRI of 95 plus is considered phenomenal color rendering 90 to 95 is considered great 80 to 90 is considered good and anything below 80 would be considered poor so you'll just want to make sure that when you're investing in lights you have the highest C that you can find I think all of the lights that I use have a CRI of 95 plus so one of the last things to consider when getting lights is going to
be diffusion and how it works when you shine a light directly onto something or someone it's going to create harsh sharp Shadow lines which typically isn't ideal especially if you're like me me and you were not blessed with Perfect Skin the way to soften the light and shadows is going to be with diffusion a common misconception is that you can just slap a diffuser directly onto the light like this here is what the light looks like without the diffuser and here's what it looks like with one right on top of the light there isn't really
much of a change because you're not really Distributing the light any different there's still hard Shadow lines and it might just be a little less bright what you want to do is actually make your light source larger you want to make it as big as possible and then you also want to bring it as close as possible to your subject or whatever it is that you're filming the cheapest and easiest way to do this with an LED panel is going to be to purchase a light St adapter with an umbrella holder and an umbrella diffuser
the adapter mounts to the light stand and then you would Mount Your LED panel to the adapter you then open your umbrella and put the pole into the stand adapter and clamp this in place remember you want your light source to be as big as possible so you want to get that umbrella as far from the LED panel as possible so that I can shine and spread across the entire surface of the umbrella diffuser now your diffuser becomes the light source and the bigger the light source the softer the light now you can see the
difference between using a light with and without diffusion the shadow lines are much softer with diffusion and the light almost wraps around my face face compared to the non- diffused side aside from your lights and diffusers you'll also need to purchase light stands these are the things that your lights Mount to and hold your lights I'd recommend investing light STS that can get up to 7 to 8 ft high you'll want your lights to shine down from up high and point down to nicely light you your prep table your food and your pots or pans
if your light stance can't get that high the light source going to come from below and it's going to look like your telling a scary story at a campfire the lights I'm planning to use for this course is the HPS softbox light kit and I got this for around 80 bucks on Amazon I did also purchase some other brighter LED light bulbs that are 2600 lumens and 5,000 Kelvin color temperature this kit comes with light stands and the softbox and diffusers that's built into the light fixture the other thing that I purchased for these were
some dimmers and extension cords because my Outlets are a bit far from my prep table this light kit is an amazing beginner setup and it's honestly all you really need to make amazing quality cooking videos later in this course I'll break down how to position these lights in your kitchen for every single step of filming a recipe and for capturing photos for a YouTube thumbnail
Related Videos

12:54
Easy Cinematic Lighting Setup for YouTube ...
THAT ICELANDIC GUY.
165,478 views
10:13
This $200 Video Light is Incredible! (Aput...
DSLR Video Shooter
513,299 views

21:05
Watch BEFORE buying a light for video & fi...
Content Creators
738,658 views

8:24
Secrets to Perfect Lighting Setup in Small...
Gabriel VIP
31,019 views

9:40
EASY Cinematic lighting setup for YouTube ...
Jacob Obling Nygaard
19,642 views

25:52
YouTube Lighting Tutorial: Complete Beginn...
Think Media
217,432 views
7:55
your first video light should be a...
The Granite Gaffer
31,607 views

6:59
One Lighting Tool That Changed Everything
Piero Gianni
155,066 views

17:42
Top 10 Lighting Mistakes Beginners Make
Full Time Filmmaker
606,844 views

27:24
How I shoot recipe videos
Adam Ragusea
694,694 views

12:58
Best Lighting for YouTube Videos (Simple &...
Primal Video
175,920 views
8:02
EASY Cinematic lighting setup for YouTube ...
Lila
1,310,023 views
19:47
Watch this before buying LEDs
Fix This Build That
3,102,331 views

10:43
Easy Lighting Setup for YouTube Videos (i ...
THAT ICELANDIC GUY.
33,451 views

13:40
Best LED Video Lights Under $100
Anthony Gugliotta
141,725 views

9:30
10 Camera Angles and Shots for Cooking Videos
Philip Lemoine
169,323 views

4:25
Stop Using Video Lights Like This! (5 Comm...
Think Media
552,886 views

12:43
Is this the ULTIMATE Video Light?
Gerald Undone
48,813 views

27:46
Burglars Hate Me For Showing You This!
HAXMAN
3,872,949 views

10:07
This All-In-One YouTube Studio Setup Rocks!
Think Media
296,663 views