This EASY AI Agent System Creates Faceless Videos on Auto Pilot! (Free n8n and Make templates 🍄)
14.78k views2554 WordsCopy TextShare
Sabrina Ramonov 🍄
FREE n8n/Make template: 👉 https://www.sabrina.dev/p/easy-ai-system-creates-faceless-videos-on-auto-...
Video Transcript:
Faceless AI videos are blowing up on social media, getting millions and millions of views. And the best part is you can now create them in an automated way without having to sign up for five different tools for generating images, videos, audio, and captions. In this tutorial, I'm going to show you how to create an automation that makes faceless AI videos on autopilot.
And you'll be able to download and import the template for free. Just check the video description. I'll walk you through the quick setup to get this running for the first time, as well as customization options for more advanced features and also the most common issues that you might face.
Here's an example of a faceless video created by this automation. Did you know Napoleon was once attacked by bunnies in 1807? After signing a treaty, he hosted a rabbit hunt.
But when hundreds of rabbits charged at him, he fled the scene. The bunnies weren't fierce, they were just too friendly. And so this is automatically created within the workflow and posted it to my Instagram.
And real quick, if you don't know me, my name is Sabrina Romanov. I'm an AI educator with over 700,000 followers across social media and my newsletter. And I previously built and sold an AI company.
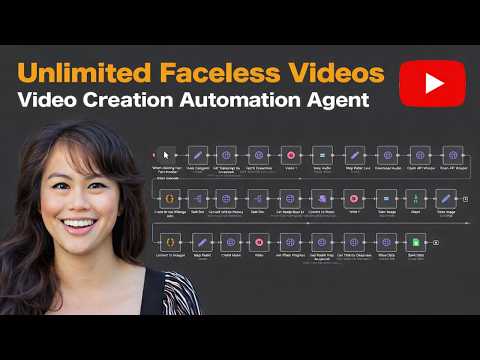
So hit like, hit subscribe, and drop a comment below if you want more free and make templates without having to join a school community. Okay, so let's dive into how the workflow works. There are basically three parts.
Number one is writing the video script. Number two is creating a faceless video and number three is publishing to social media. So I'll walk through what each node does first and then I'll explain the only two nodes that you need to edit to get the entire workflow up and running for the first time.
The first step is researching and writing a video script. This trigger will run every single day, but you can customize it if you want it to run every single hour instead. Okay.
And then this AI agent node is responsible for brainstorming ideas for faceless videos. You can put your theme here. My placeholder is little known history facts about a famous person.
Then it selects one of the ideas and researches more information about that idea. And then it writes a 15-second video script. Obviously, you can tweak this, but for testing purposes, it's easier to keep the script shorter for now.
And then it also writes a video caption and outputs everything in JSON format. That's what this is. is the structured output parser so that the output uh is always nice and structured this way.
And then for brainstorm idea, you just need to connect your open AI account and choose whichever model you like. I personally think 40 is just fine for this. This first part will output our video script as well as the video caption.
Now the next step is to actually create the faceless video. And for that you will need an account with blot. com.
This is an app that I've built. It's basically an all-in-one content creator tool where you can remix text posts as well as make AI images and AI videos and it has an API as well for publishing. Once you sign up, you'll want to go to settings on the bottom left here.
And this is where you're going to connect the social accounts that you want to post to. When first trying this out, I recommend just connecting with Instagram or Tik Tok or Facebook, like one of the platforms where you can easily publish a video. Okay?
And then these are all of your connected accounts. And these are your accounts ids. To get your API key, scroll down to API access and there will be a button to generate your API key.
Note that again this is a paid feature. So don't do it unless you are ready to convert to a paid subscription. Here are the API docs for creating a faceless video.
Go to help. blot. com.
Okay. And here's the create video endpoint. And what's really neat about this is it combines a lot of different functionality into one simple API call.
And so you may have seen lots of other uh tutorial templates that show you how to make faceless videos, but you have separate API calls to generate the images, to generate the videos, to generate the captions, and to generate the voice over and also to stitch everything together so that it can be published to social media. This one API endpoint unites everything. You put in your template script style you want animate first image or if you want to animate all the images and then you can choose your text to image model as well as your image to video model and we have all the good ones.
Frame pack is the default one because it's the cheapest but there's also runway luma cling 1. 6 miniax hyen and Google's v2. Now this template object is really interesting.
So scroll down here template. Right now I have two types of templates. Empty basically means uh AI will just take your script as is, clean it up a little bit, and generate a video with an AI voiceover like you'd expect.
However, if you want an POV type of template, like those types of POV videos are going viral, uh this template will basically interpret your script and then change it into a POV style of video. For this tutorial, we're just going to leave it empty, but this is something you can play around with. And just note that for each template, there are slightly different options, right?
So the empty template has these options already baked into the workflow automation. So you don't need to add them. But if you do switch to the wake up template, keep in mind that you have these additional parameter options as well.
Okay. So to set everything up, make sure you've grabbed your Blot API key, expand this so it's easy to read. All you need to do at this point is insert your Blotato API key here.
You don't need to touch anything else, but I'll still walk through what the values are. As I was saying, the empty template will basically take your script as is and then convert it into an AI video and it will use this voice over. If you want uh different types of voices, you can you can check them out here.
And then the caption position can be top, middle, or bottom. The script is pulled from the AI agent that wrote the script. And the style can be like cinematic or horror, all the different styles we support.
For this template, you're only going to animate the first image in your scene. If you don't want to do that, if you want to make it even faster to test everything, change it to false. Okay.
And then if you want to animate all the images, just like I was showing you within Napoleon example, you'll want to set this to true. And this is where you put your text image model and your image to video model. So I like to use Recraft if you want realistic looking images with people.
Otherwise, Flux Pro is also really, really neat. Okay. And that's all you have to touch there.
You don't need to touch these three other nodes. This create video node will take all of the information from the previous step, right, and populate it over here so that it's ready to go. And then you wait for the video to be completed.
And by the way, the weight amount is something you may want to change depending on the length of your video. So when you're animating images into video clips, that process alone takes 5 minutes. And then it also takes a couple of minutes to render the final video.
So if you are animating any image into a video, I suggest a minimum weight amount of 10 minutes, even longer if your script is longer because again we're generating all those video clips and then rendering the video itself. So it takes some time. And then this step, get video, just retrieves the video when it's done.
Pretty straightforward. Again, you don't need to touch anything else except the prepare video node. Okay.
Now, once your video is ready, you'll want to prepare it for publishing. So go ahead and open this node prepare for publish. And here you'll want to fill out again your Blot API key and one of your accounts ID.
So let's say Instagram ID. Go to Blot settings, find Instagram, click copy account ID. Okay.
Then paste it in right here. Okay. So whichever account you have, whether it's Instagram, Tik Tok, or Facebook, I would suggest enabling only one of them for now while you're testing.
And you don't need to change anything else over here. This uploads the media to Blow. Technically, you don't need this node because we already created the video in Blotato.
But I will leave this node here. In case you decide to change this workflow and upload some other kind of video or generate it with some other kind of service, then you will need this upload step. So, I'll just leave it in here for now.
Okay. And then all of this, even though it looks complicated, it's just publishing to the different social platforms. Okay.
So, I have only activated Tik Tok and Instagram here, but you should just leave activated the one that you're testing on. So, if you're testing to Facebook, click this button to activate it and then deactivate the other ones. Okay?
So, just activate the only one that you want to test to and then you should be good to go. That's all you need to do to run the initial version. So, just to recap real quick, all you need to do is prepare video, put in your API key.
Okay, that's it for that node. And then prepare for publish. Put in your Blot API key and one of your account IDs.
And that's it. It's all you need to run the entire workflow the first time. Now, if you run into any issues on your first run, you can see it here in Blot.
Go to failed post. You'll have a log here if something fails. Here are some other common reasons why your run might fail.
If you're getting an unauthorized, just make sure you're copying your Blot API key correctly. If at this step get video, it's returning uh ready instead of the actual video URL, that means the video isn't done exporting yet. So, you'll need to increase the wait time.
So, again, 10 minutes is the minimum I recommend. If you are animating your images into video clips and if you have longer than a 15-second script, if your social post fails, just make sure that your accounts ID you've copied correctly and you may want to refresh the connection in Blot. Okay.
And all the videos you create through the API, you can also see within Blotato. So if you go to videos, view latest videos. Here's the Napoleon one that I just made through this automation.
And here's the video itself. And this uses frame pack for animation and recraft images. So these are really high quality videos achieved through this single API call is pretty amazing.
And you can choose to mix and match different image and video models. So now I'm going to talk about uh the ways to customize this workflow so that it fits your niche and fits your style. Okay.
So starting on the left hand side, the AI agent. Open this up. Click this to expand it.
Okay. And obviously you'll probably want to change the niche. So here I'm just brainstorming ideas on this niche.
You may want to change the duration of the video scripts. Uh you may want to change these instructions. I recommend leaving this as is the output format because uh this is a nice clean structure that makes it easy for processing.
So that's one thing you want to customize. Open prepare video again and then expand it by clicking this and there's a bunch of stuff here that you can customize. So go to the blot API docs create video.
Okay, here and again these are all the different parameters and options you can choose from. So, right now we're using the empty templates, but you could try the POV templates. There's lots of different 11 Labs voices you can choose from.
Click voice ids here to see all of them. Caption position top, middle, or bottom. Like I walked through before, you can customize all of these different options.
So, if you want animated video clips, if it's your first time doing it, I just set this to true. Don't animate all of them yet. Once this is good to go, then you can set this to true, right?
To animate all of them. Okay? And like I said before, mix and match the text to image models and image to video models.
I do recommend frame pack. It's the cheapest and works pretty well. Um there are other more expensive ones like runway cling 1.
6 is great as well, but really recommend this for 99% of use cases. And the last thing here to customize is which platforms you want to publish to. So I said for testing, you just want to activate one of them.
Um but in your actual automation, let's say you want to activate like multiple of them. So you could activate, let's see here, Instagram, Facebook, YouTube threads, LinkedIn, for example. All you have to do is make sure you put in your account IDs for the respective social platforms, right?
And that's pretty much it. You don't need to touch anything else to run it. Let's say you're having issues, by the way, running this automation.
The best way to get help is to click this orange button on the bottom right. This is a messenger, and my AI bot will always try to answer first, but if it fails to answer your question, then it gets escalated to me. And I try to answer all tickets within 48 hours.
I am a solo team. So just keep that in mind when you reach out and I'm always happy to help debug troubleshoot AI automations. So just to recap, we first wrote the video script using this AI agent.
Then we created the faceless video single API call to Blot API. Very powerful. And then we published the completed video to multiple social platforms.
And that's how the entire automation works. If you have any questions, run into issues, hit me up through the messenger. And if you enjoyed this video and want more free NAD and make templates where you don't have to join a school community, you can just download them, hit like, hit subscribe, and drop a comment below and share this video with your network.
Related Videos

23:02
My Voice AI Agent Negotiated 800+ Business...
Greg Isenberg
67,858 views

2:10:36
Master n8n in 2 Hours: Complete Beginner’s...
Jono Catliff
180,404 views
![[EXPLAINED🍄] AI Agents vs. Workflows](https://img.youtube.com/vi/xqcl9dAAkC0/mqdefault.jpg)
15:45
[EXPLAINED🍄] AI Agents vs. Workflows
Sabrina Ramonov 🍄
2,448 views

4:41
Skip the N8N Tutorials - Let GPT Build You...
Felipe Fuhr
41,107 views
13:21
AI Instagram model (influencer) - build yo...
AI Agents A-Z
8,570 views

3:50:40
How to Build & Sell AI Agents: Ultimate Be...
Liam Ottley
701,321 views
18:31
$0 Unlimited Long Form Horror Story Videos...
Andy Lo
9,423 views
13:21
This n8n AI Agent will AUTOMATE your Carou...
Sabrina Ramonov 🍄
4,485 views

24:28
Make.com vs n8n AI Agents: Which One Wins?
Jono Catliff
5,859 views
18:09
This n8n AI Agent Avatar will AUTOMATE you...
Sabrina Ramonov 🍄
28,968 views

15:00
25 n8n Hacks I Wish I Knew Sooner
Nate Herk | AI Automation
33,827 views

20:15
Build Anything with Lovable + n8n AI Agent...
Nate Herk | AI Automation
80,974 views
57:12
I Built an AI System That Creates Viral Yo...
Calvin Hia | dainami ai
7,546 views

35:50
This AI System Creates Longform YouTube Vi...
RoboNuggets
157,728 views
29:15
I Built an AI SYSTEM For Viral Faceless Sh...
Oleg Melnikov
4,631 views

4:04:47
The only video you need to Master N8N + AI...
Simon Scrapes | AI Automation
134,487 views
23:54
This AI Agent Makes Longform YouTube Video...
Graham Radina | AI Agent Mastery
36,687 views

22:13
How to Generate Ready-to-Use n8n Agents IN...
Mark Kashef
41,232 views

50:00
How to Build AI Agents in n8n for Beginner...
AI Foundations
31,622 views
24:47
How To Build a Startup Team of AI Agents (...
Simon Høiberg
610,795 views