Can You Build a Working iPhone From AliExpress...?
5.2M views3597 WordsCopy TextShare

Phone Repair Guru
Repair Tools ( Regularly Updated - With Soldering Tools ) :
https://www.phonerepairguru.com/tools
...
Video Transcript:
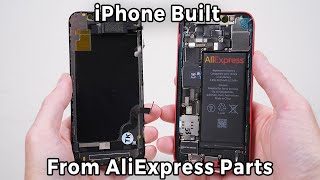
is it cheaper to build an iPhone from scratch using only AliExpress well that's exactly what we're going to do in this video inside this box we have every single part needed to build an iPhone 13 Pro from scratch I made sure to get the cheapest yet highest reviewed products from them because well I don't want to use them and find out they don't work which could definitely happen if this works I'll let you guys know if it's cheaper and I'll actually drop the links to everything I've bought here in case you want to try this
yourself I'll though I don't recommend you do I had my editor open these up and make sure we actually got what we ordered but I haven't seen them yet so I'll be just as surprised as you are uh we'll clean this up a little bit move everything aside so there's actually a lot more to ordering this than I thought there was you have to order a lot of the small parts individually and the price was really starting to add up let's take a look at what's inside this box uh oh looks like that's the actual
phone housing let's see what's inside so I ordered this part with the small parts as well because it was the most costeffective solution however sometimes the small parts are very low quality and you're about to understand what I mean in one second we'll pull this out oh huh this actually looks pretty good it also came with the seal which is very important I didn't even think to order this but thankfully they gave it to me and it comes with the battery pull tabs that's nice of them let's take a look at the actual housing by
small parts I basically just mean the loudspeaker the charging port whatever antennas are here wireless charging coil The Flash and some more antennas up there all this stuff if you were to buy individually would cost so much more so buying this as one whole piece is the most cost effective thing to do and it's also less work for me we'll take this out so when you buy stuff from AliExpress they always come with weird stamps and uh they also come with stickers but underneath the sticker oh my God it's taptic engine this is a trademark
of Apple I believe so they have to cover it they also do the same thing on the back the Apple logo is covered but it is there let's take a look at the next part we'll put this aside we have this little guy let's see what's inside loudspeaker earpiece WiFi huh oh yeah so this is just the earpiece speaker the housing didn't come with it so I had to buy it on its own without this you wouldn't have the uh dual audio and and you also wouldn't be able to take phone calls on to the
next one let's see what's inside Ali Sunny this was such an expensive part I was really trying to save money but unfortunately I just couldn't it was expensive there's nothing you could do about it most of these on the market are actually Apple original it's actually kind of hard to find a camera that's fake for iPhones I don't exactly know why but if we take a look at this camera we'll probably find that it's original and I kind of want to see right now well I kind of want to keep that on because I don't
want to get dust and debris in this one let's put that back so to check if this is original we can actually just kind of lift up the flex cable and voila you can see there is an Apple logo there so that one's original there's obviously three cameras here so there's going to be more than one Flex cable let's take a look at the other one and very hard to see you can see the reflection of the metal there's another Apple logo there so all original parts here good job still cost me a lot of
money though this is oh the most important part of the phone the motherboard but it's not just the motherboard it's also oh oh I honestly forgot to buy the screws but the motherboard set came with them so thank God we also have the bottom piece screws that are pretty important not going to lie and we have another seal we have uh trash tools I hate these I don't know why they always come with them they're terrible don't use these they will make you want to smash your head in um whatever meme we have available now
let's take a look at this you can see this comes with the front camera why does this come with the front camera well obviously face ID Apple serialized face ID so um to get that working you obviously need the corresponding components which in this case is the front camera we have the dot projector the infrared camera these two come together so that you can still have face ID and uh well I hope that this is even working the reviews were pretty good so hopefully it is the board actually looks fine let's get a closer look
here this was probably the most expensive part of this all we do have some stickers on here and some writing so I'm sure some repairs have been made to this board before uh unsure of the extent however a good sign is that all the protective coatings on the board are still there so this is a bigger box hopefully uh it's a good one oh it's the OLED display AliExpress has a variety of displays up for display uh but a lot of them don't look that great so I just went for the cheapest one that I
could find that is an actual OLED not an LCD uh again crappy tools nobody needs that uhoh let's take a look at this display so a few things we're looking for is how big the chin is how the display looks uh how the chips look on the display how the flex cable looks there's there's a lot when it comes to displays and it's actually really hard to find a good quality display on the market especially on AliExpress oh um yeah I I don't like what I'm seeing here so we have a weird chip over here
it says latis I think that is used to grow eyelashes but we also have OLED on the the flex cable this Flex cable appears to be aftermarket sometimes they actually take original Apple Flex cables and then put them on their displays the actual display itself seems to be a bit thicker than what I'm used to seeing not really a good sign when you're buying a display you want to avoid void displays like this for the most part but I'm on a budget we'll know when we actually turn this on but you can see that yeah
the bezels look larger than what I think they're supposed to look like my biggest concern is whether the display works because the defective rate on these displays is just insane what is this this is obviously the battery we'll take a look oh okay interesting oh that's actually really nice so this battery uh looks exactly like the Apple original battery very cool and it also comes with The Forbidden cheese on the back um hopefully this works uh it looks great and looks Apple original so we probably won't have any issues with the battery oh what the
hell uh more seals thank you China this is the proximity and ambient light sensor this didn't come with the display we had to buy it on its own pretty expensive for what it is but it's just you can't get around this you need this so we'll put this aside and I think we're almost done here we have the lar sensor these are actually serialized and you do lose some features when you replace it with with a non original one but it's nothing crazy and most people don't even notice we'll put that aside and the last
one what uh it looks like we're done uh let's start building this [Music] phone so a few things we want to look for on the housing before we start building anything is whether it's not so there is supposed to be a little nub here for the Sim ejector tray basically it it pushes on the board and then pops out the SIM tray but it's not there let's see if we have it in here and looks like it's right over there so we're going to take this with our tweezers a lot of people install housings and
they forget this and that's just awkward because you're stabbing the Sim ejector hole and nothing's happening now it's in there and look when I put something in the SIM tray it pops out and then the board's like okay let's pop out the SIM and that's how that works next up um honestly I'm I'm a little bit worried because I have no screw chart or uh anything of the sort so putting the screws in this is going to be uh we're going to take the board and we're going to take the battery I want to kind
of visualize what I need to do first here before I actually do it so I'm not wasting any time I think before we do anything we should probably install the liar sensor because that goes under the camera so let's do that we're going to take our liar and we're going to place it over here now to the best of my knowledge there is a plate that goes over the liar usually to hold it down and unfortunately the screws that we got didn't have everything so we had to wait and purchase more screws again they came
really fast surprisingly and they weren't expensive at all this has all the shields that we need this one doesn't let's find the lar shield first these are actually called cow links I believe but nobody likes calling them that so I probably won't and this looks like it could be it that looks pretty good to me what do you guys think so right off the bat you you can see there's a tiny bit of a gap Under The Shield here and that tells me that we need one of those big boy screws one of the thicker
screws that house other screws so before we install this we have to put one of those underneath the shield which is exactly what we're going to do to be honest when you're screwing stuff in an iPhone it's better to not have a screw at all than put the wrong screw in because if you put a long screw in well it can pierce the back glass and the whole project would be a complete failure I'm going to go for this guy he looks pretty chill we'll screw this guy over here and then we'll Place The Shield
over I'm going to say that looks good to me so we're going to just go ahead and screw that in perfect now I think we're all good to install the back camera before we do that we have to make sure there's no dust and now we're going to put the cameras down nice now we can install the shield it looks like we're missing another one of those bigger screws so we're going to have to find another one I'll just grab this guy he looks good enough and we're going to put him over here if you
think you're good at repairing phones you should try this it's a challenge that all looks pretty good finding the correct screws for the Right Slots was very difficult to say the least I did find out later though that Apple has a screw chart available for their iPhones online why did they black out their own logo though now it's time to install the front cameras before we install the earpiece speaker the front cameras actually came with this little yellow tape that they put over the camera and the infrared camera that's pretty cool because it prevents me
from damaging in them for the most part these front cameras don't have any screws so by placing the speaker over it it looks like we'll have to remove the camera shield first what's really interesting is the earpiece speaker connects via these two contact points to the pads over here and then that connects to the board but all the sound is funneled through the speaker up here which actually has a rubber ring here to keep the phone water resistant and that rubber ring connects to the housing over here there's a little cavity and and all the
water if you were to submerge this phone into water would go in the speaker and wouldn't leave the speaker we're going to insert the earpiece speaker and perfect it looks like it is holding down the front camera so we have nothing to worry about we have to find screws for the earpiece speaker um we'll just pick out some ones that we think are appropriate the iPhone 13 Pro is now looking pretty good I'm not going to lie all that's really left to do is install the motherboard install the batter battery install the screen and then
test everything out cuz we still have no idea if this thing even works and I'm kind of scared to do that honestly because there's so many parts that could be faulty or could fail it's uh it's going to be a surprise for even me we'll go ahead and install the board now we can slide this in it's quite difficult to get this in with this many Flex cables you got to peel them up sometimes I'll install the board and then realize that there's a flex cable under the board so I have to unscrew it again
and then peel up the flex cable cable and do it again I think we should be good yeah everything looks okay so this little gold ring over here to me indicates that there is a screw that's supposed to go there that holds down the board it's kind of like a protective layer we'll take this screw and we'll test it out nice okay that worked now what I do with the battery is I usually remove this it's the peel for the Forbidden cheese and before I fully place the battery down I connect it to the board
I do this because I want the positioning of the battery to be right so that it's easy to click it in instead of struggling and fighting the phone there we go that looks very clean now we're going to click in all the connectors there's a lot of them but this process is really satisfying we're just going to go one by one sometimes they're misaligned which makes life incredibly hard so you can see that we are missing a connector over here this fat one there but that's for a 5G connector I believe I think that's a
region thing so some regions will have it some don't Canada doesn't have these we'll see if that affects anything later but as of right now I don't think it will if you guys are enjoying the video so far comment the Apple emoji and let me know cuz uh I need some moral support this looks really good it honestly looks OEM almost without the drawing and the weird stuff we'll go ahead and install the Sim perfect it's time to work with this very crappy Latisse screen here is our proximity sensor we'll get this out of its
plastic so we're going to remove this blue tape and this actually says MK and there's actually an Apple logo here which means this is also OEM I hope you never really know nowadays well put that down align everything and there we go there's still a plate that's supposed to go over this we have to find it I think it's this one and it is so now we have to find very small screws because this is extremely fragile if I get a longer screw and screw this in well the OLED is done we'll grab this one
it's pretty small I'm not even going to screw it in all the way because I'm scared damn there we go now the Moment of Truth does this thing boot let's find out we'll plug this in and we'll plug the display connector in and we'll plug the battery in I'm actually nervous right now if this works I'll let you guys know how much this costs in comparison to a refurbished device and if you're crazy enough to recreate this well I'll drop the link to every single part that I bought in this video for you guys to
try I don't think you will but if you do I salute you it's time to test it out we're going to first just press and hold the power button if that doesn't work I'm not going to freak out because it'll probably just need the charger let's try it out 3 2 one oh okay that's the Apple logo that is the Apple logo there's still so much to test oh oh my God it booted it's on it says Beijing that's how you know it's from China but it is on that is insane no sim available that's
a good sign damn we know that the screen works but do we know that everything else works not yet but we will very soon let's go ahead and hit the flash icon and we already ran into our first problem what the hell looks like it was just disconnected hopefully nothing else is uh disconnected and let's go into the actual phone so obviously we are going to get some uh unknown part messages that doesn't affect anything too much it is kind of annoying but nothing to really stress about the one thing that uh needs to work
is the face ID because we paid extra for this motherboard for the face ID to actually work so this display is actually not bad at all I thought it would be terrible based on the the build quality it is still a little thicker than what I'd like it to be but it looks like a pretty good quality display I'm not going to lie we'll go ahead into the camera app and check that out so we have the wide angle we have the main camera and we have the three times camera that all seems to be
working the front camera seems to be working as well we're a little bit green right now but hello and let's check out those videos and see if the audio is working the front camera seems to be working as well we're a little bit green right now but now I definitely want to test face ID but to do that we're going to have to open this up remove these yellow stickers and slightly click in the screen we'll head to settings face ID and let's see if this works it does seem like it's working and it actually
works AliExpress thank you there are a few caveats with this build but I mean everything works so as I promised let's talk about the pricing what you going to do J show me the money the most expensive part of this AliExpress phone is obviously going to be the motherboard and the front camera those came in at $220 Canadian and I'm still surprised that they even work the next thing that cost the most is going to be the front screen the front screen was $115 Canadian it's good but it's not as good as the original still
it's definitely better than what I thought it would be next up we have the housing with the little Parts this was $88 Canadian for the actual frame and the charging port and everything else the only thing that I'm really noticing with this is that the vibration on it is not as strong as the original it feels very weak and honestly sounds kind of weird the back camera was $76 and well it's Apple original so that seems pretty fair to me I made sure to apply as many coupons as I could to bring down the overall
price and uh well this AliExpress phone that I built from scratch cost me $52 Canadian oh uh we we forgot the screws the screws were additional $5 so it cost me $57 that's absolutely insane considering the average refurbished iPhone 13 Pro cost around $700 Canadian although doing this is incredibly risky and I can't say I recommend it but if you want to try it well the risk is uh yours to take anyway guys thank you so much for watching I hope you enjoyed this one I'll see you in the next one peace
Related Videos
13:58
Building The Cheapest iPhone Possible Usin...
Hugh Jeffreys
358,708 views

15:15
Don't Buy a Phone From This Company...
Phone Repair Guru
493,619 views

32:51
How I Made My Own iPhone from a Block of A...
Strange Parts
694,556 views

10:07
They Didn’t Mention This... S25 Ultra Tear...
Phone Repair Guru
351,978 views

24:43
I built a MODERN apple iPod...
Zac Builds
753,044 views
15:44
I made a USB-C iPhone 13
Restore Technique
7,603,349 views

20:57
I built the ULTIMATE GAMING phone...
Zac Builds
1,804,021 views

27:40
I Turned a PS4 into a Handheld Console
Restore Technique
2,267,513 views

20:19
Apple Knockoffs from Temu Surprised Me!
Snazzy Labs
1,286,114 views

8:49
The Camera Rings are Fake! (Galaxy S25 Ul...
JerryRigEverything
2,492,279 views
11:03
The CHEAPEST Screen Replacement Possible...
Phone Repair Guru
407,195 views

10:11
The FAKE iPhone 16 Pro Has It All...
Phone Repair Guru
1,611,640 views

10:53
What Are Amazon Refurbished Airpod's...?
Phone Repair Guru
123,332 views

22:24
Phone repairs are getting ridiculous - Her...
Mrwhosetheboss
4,968,475 views

28:01
I bought the most EXPENSIVE Tech on the in...
Mrwhosetheboss
16,555,115 views

19:13
How I Made My Own Android Phone
Strange Parts
9,786,071 views

1:14:33
I BOUGHT A FLOOD DAMAGED ROLLS ROYCE CULLI...
Mat Armstrong
9,751,962 views
12:09
How Is This Still Working...? Pixel 9 Pro ...
Phone Repair Guru
344,598 views

14:09
FAKE iPads Are Here...
Phone Repair Guru
1,251,497 views

18:11
Building a REAL PlayStation 5... PORTABLE!
DIY Perks
6,111,761 views