ImageJ Tutorial 1 - Measure Leaf Disease Area & Lesion Counts
54.52k Aufrufe3577 WörterText kopierenTeilen
UF IFAS Horticultural Crop Physiology Lab
This is the first in our lab's series of ImageJ Tutorials! This tutorial is all about measurements o...
Video-Transkript:
in this video tutorial we will download the image J software we will set scale for photographs and for scanned images you will calculate the percentage of disease damage for a few sampled leaves for multiple plants we will also count the number of lesions on the same leaf from a scanned image and a field photograph the first step of course is always to download the image J software in order to do that you need to go to the image J site which in this case is image J nih.gov /ij when you are there click on download
and choose the appropriate operating system which in my case is Mac OS X for you it might be Windows or Linux you click the link download the program another possibility is to download Fiji which is a batteries included version of image J that has many plugins already downloaded into the system the procedure is the same you go to the website you click the appropriate operating system download and open up the program you can also download other plugins into image J one example might be wicka segmentation for training image j to automatically process images in order
to set scale for a photograph first open the file go to file open and navigate to where the file is located select the image and click open on many computers you can also drag the image onto image J's graphical user interface and the file will open our first example for setting scale in this case is a photograph this is a photograph of black bear leaves laid flat on a piece of white copy paper it was taken with a sony DSC rx100 compact digital camera in a room with only ceiling lights if taking photographs indoors use
a tripod to keep the camera steady in the same spot for the whole set of images and lay the leaves on a high contrast background like this white sheet of copy paper include a reference object of known size in the image like the ruler in this image so the image can be scaled the reference object used for scaling a photograph should always be large and near the object of interest now that the file is open select the straight line tool from the graphical user interface draw a line to an object of known size in this
case the five inch ruler holding down shift to keep the lines straight as you do it go to analyze set scale to set the scale of the line you just drew to five inches change the known distance to five and the unit of length 2 inch notice the global box as well when the global block option is checked the same scale will be applied to all images opened after this until image J is quit or a new scale is set this can be useful if a whole set of images were taken at the same scale
go ahead and click OK we're going to save a copy of this scaled image because we're going to use it later you can go to file save as test I'll just go ahead and save the first step in scaling scanned images is to obtain the image pixel dimensions resolution and physical size on a Mac the images physical size and inches its dpi and its pixel dimensions can be obtained by opening the image in preview and going to tools adjust size the second step to scaling a scanned image is to import the image to image J
we're just going to do the drag-and-drop technique this time around this is a scanned image of a tomato leaf from an Epson perfection V 800 flatbed scanner next we're going to go to analyze set scale notice that the pixel dimensions for the image are listed in the upper left corner of the image and image j enter 3400 as the width of the image in the distance in pixels and then go back to our preview page we notice that the width of the image is 8.5 inches we're going to put 8.5 and then fill inch for
unit of length you can do whatever you want with global if you have a whole set of images that are the same scale go ahead and check it if not just click OK and now our image is scaled and we are going to go ahead and save a copy of that scaled image so we're going to go file save as TIFF go ahead and save do you remember the blackberry leaf photograph from earlier the lesions on the leaf area are actually from ops this leaf flight we are going to measure the total area of the
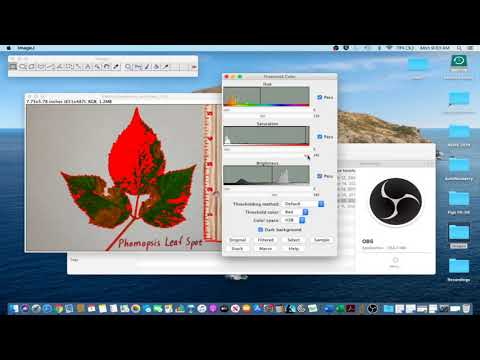
leaves and then we are going to measure the diseased area of the leaves with that information we can calculate the percentage of disease damage so let's get started first let's separate the leaf from the background go to image adjust color threshold and adjust the hue saturation and brightness to select the entire leaf area in this case the hue range from 0 to 110 works pretty well and then we can play with the saturation and brightness these values vary depending upon the image click select when you are satisfied next go to process binary make binary to
convert the color image to a binary black and white image well we'll need to remove large clusters of pixels that are not part of the leaves so go ahead and double click on the paintbrush tool and put 50 in for the brush with and white for the color and then make sure that the paint on overlay box is unchecked and click OK go ahead and erase the pixels that are not part of the leaf you only get one undo here so if you erased part of the leaf you have to start over after you've done
that ordinarily if there were smart small clusters of pixels you wanted to get rid of you would go to process remove outliers process noise remove outliers but in this case we don't actually have any small specs so we can go ahead and skip this step now you want to go to analyze and then set measurements go ahead and select area and limit to threshold and then make sure that all the other boxes are unchecked click OK finally go to analyze and measure another way to do this is to just do ctrl M both of those
will measure the area go ahead and record the area from the results window for the total leaf so we're gonna say total leaf area which in this case is 11 point zero one seven minimize that again you can just keep the results open and if you want to save the process image go ahead and do that save it by a unique name go - total then we're going to close that image we're going to open up the same image again except this time we're going to capture the area of the diseased leaf area so you
want to go to the image adjust color threshold again or in this case just click on the threshold window because it's the open and then hue range from zero to 40 works well in this case we're going to play with the saturation and brightness again until we're satisfied okay so that's pretty good we're going to click select and then we're gonna go to the process binary make binary and notice there's some large pixels here and some little pixels we already have the paintbrush tool selected we're gonna go ahead and erase those now in this case
there are a few small pixels that are actually difficult to get with the paintbrush so we're going to go to process noise and remove outliers we're going to select five and we want it to be dark outliers I'm going to select the preview button and as you can see that actually probably gets rid of a little bit too much in this case so we're going to select this down a little bit we do one okay so one does a pretty good job so we'll go ahead and select it okay and then finally once again we
want to go to the control m or the the analyze measure of those will work and in this case we have an area of two point zero five nine go ahead and record that as diseased leaf area and then if you want to save a copy of the image just go ahead and save it with a unique name and we can actually probably close that at this point and then in order to calculate the percentage of disease damage we want to go ahead and divide the disease leaf area by the total leaf area and then
multiply that whole thing by a hundred and there you have it that's the percentage of disease damage we just captured the percentage of disease damage for a few sample leaves but what about capturing the percentage of disease damage from multiple plants let's pull up another image this is a photograph of cucumber plants on metallized plastic mulch taken with a sony DSC rx100 compact digital camera they have downy mildew and the damage is displayed as necrosis on the vines go to image adjust color threshold to separate the canopy from the background set hue between 0 and
120 to saturation between 58 and 255 and brightness between 9 and 255 click select when you are satisfied now that the canopy is selected we will need to set the background color to white go to image color and then color picker double click the B and the C P window and then fill 255 in for all three cells in the background color window then click OK and then close the CP window go to edit and then clear outside since we set the background color to white clearing outside will result in a white background the next
step is to use the paintbrush tool or process noise remove outliers to remove pixels that are not least we are just going to go ahead and use the paintbrush tool so deselect and then use a paintbrush tool still have the settings from earlier brush with 50 color white on paint on overlay not checked okay we're just gonna remove all this junk now another way to do this actually which might make it a little bit faster just gonna use a freehand selection tool for some of this junk okay and then so you're outside again there we
go deselect that and select the paintbrush tool and get stuff a little bit closer love that shortcut um actually this stuff is pretty small so I'm gonna go ahead and process noise remove outliers okay let's see how big the outliers need to be in order for this to work we still have dark selected maybe like five in this case see what happens yeah that's pretty good now I select that okay so then we cleared all of the noise and to clear the background so we're gonna save this image file save as tiff with a unique
name no background I'm gonna save and then we're gonna close that image and we're gonna open it again there we go now that kind of resets it so we can select threshold again without it resetting the image so we're gonna go to our threshold color picker we're gonna try to select the entire image area because we changed some things around we can't use the same settings we don't have to play with it a little bit and that seems to work so we're gonna go ahead and select that now we're gonna go to process binary make
binary which makes our image into a binary image and then we're going to go to analyze measure or control and and then we're going to record the results from that now notice that this is actually still in pixels but it doesn't really matter because we're using this information to get the the percentage of disease damage so anyway this is the total canopy area which in this case is seven nine eight nine six five four now that we've got that recorded we're gonna go ahead and save this processed image with unique name there we go this
one is total go ahead and save that then we're gonna close that image we're going to open up the scale the the no background image again we're going to do the same thing except we're going to capture the disease canopy area so let's go to our color threshold we're going to go 0 to 45 and then saturation between 0 and 155 and then the brightness we're gonna go from zero to 254 go ahead and select then we're gonna go to process binary make binary and that gives us the [Music] diseased leaf area we're going to
just measure and record disease canopy area which in this case is five zero four three five zero and then in order to calculate the percentage of disease damage we are going to divide the disease canopy area by the total canopy area then we are going to multiply that whole thing by a hundred and wha-la then we're going to save as tiff diseas'd the real problem with the word disease there we go the next data we will be collecting is the number of lesions on the leaf we will begin by using the tomato leaf scan which
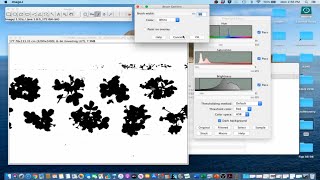
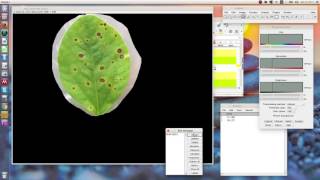
was our example for setting scale for scanned images the tomato leaf has bacterial leaf spot display to add small dots on the back of the leaf begin by selecting the rectangle tool on the image graphical user interface select the smallest rectangle possible around the leaf go to image crop then go to image adjust color threshold to select the leaf spots a huge between 0 and 47 saturation between 0 and 255 and then brightness between 0 and 147 should work in this case go ahead and click select all right now go to process binary make binary
to convert the color image to a binary image notice that there's leaf outline one helpful trick when removing pixels from a binary image is to pull up the original image just so you can compare and contrast we're gonna go ahead and do that magnify you can do that by command shift + as you take a look at the image see what it is we're looking at here all right now you want to select the paintbrush tool I really care about the leaf spots that are on the edge of the leaf so we're just gonna go
ahead and erase okay so we got rid of the outline but there's also a lot of little spots that don't really look like they're leaf spot inside here so we're also going to get rid of some of the noise this so then that first step gets rid of the large pixel clusters now we're getting rid of the small pixel clusters in this case let's see we're looking at radius of five isn't super great it gets rid of some spots that are leaf spots what about radius of one that is a little bit better we're just
getting rid of little spots that do not appear to have any relevance we're gonna go ahead and click okay for that and then next we want to go to analyze and then analyze particles there's a lot of different options in this window that are relevant the default for size is particle sizes of 0 to infinity this will select particles by size all of the particles by size and then it doesn't matter if it's pixel units or not in this case because we're counting the number of particles and then as far as circularity goes zero is
something that's completely not a circle and then one is a perfect circle we like to have visual data so I'm gonna go ahead and click on outlines for what to show this is going to make an image that has the outlines of the dots we do want to display the results of the analysis we do want the summary of the analysis we do want to clear previous results and so all those are checked we want to exclude any dots that are on the edges like if the image had dots on the edges we would get
rid of that we want to include holes that means that if there was say like a circle and then another circle inside of that it would count that as just one that's what we want here so that's good and the other stuff want to leave it unchecked so go ahead and click OK there we go this is the processed image even further processed all these little red dots if you scroll in those are the numbers so so those are the summary gives the total number of particles we can go ahead and record that will say
scan spots total count zero one zero five and then the results gives the area of each individual spot so now if we want we can save a copy of the different various different images so go ahead and file save as step still want scan a tomato for this - drawing go ahead and save that file save as TIFF and scan here we go this next example we will perform the same lesion counts on a field photograph of the same leaf let's go ahead and import the image ok the image was taken with an iPhone 7
smartphone since the leaf was not laid flat its edges were curling the outdoor lighting also decreased the color contrast between the healthy leap tissue and the diseased tissue so overall fewer leaf spots will be detectable go ahead and select the freehand selection tool from the image to a graphical user interface and we're going to outline the lease in order to do that what you want to do is you want to left-click and hold to start the outline then just go ahead and outline the charli's I'm going to for ease of outlining purposes cut off a
little bit of the corners of the leaf which will also probably decrease our counts but you do what you got to do now go to edit clear outside and then go to image adjust color threshold and we are going to select the threshold zero 247 we already have all the saturation we're going to select all of the brightness except we're going to exclude the widest of the white go ahead and select yeah process binary make binary that should be our dots right there there's a little bit of extra dot Enis we're gonna open up the
original image so we can kind of compare and contrast if you look closely it's a bit of dot Enis that has nothing to do with the actual bacterial spot so we're going to go ahead and it's not really well there's a look a few big ones too so we'll go ahead and select the paintbrush and maybe get rid of some of those missed one on the edge these ones down here I'm fairly certain they're not anything to do with back to your leaf spot and there's still a little bit of dot Enis around here so
we're gonna go ahead and remove some noise let me go to process noise remove outliers we have pixels of too dark let's click on the preview to see what it does that looks good it gets rid of the little dots so diameter too seems to or radius or two works just fine okay now we're going to go to analyze analyze particles go ahead and okay so we're gonna have the whole range for the size and the circularity I do want it to show my outlines again and everything else all the other options are the same
head and click okay and this gives us our processed image if you notice the count is way lower it's 55 we're going to go ahead and record that so we have the scan spots and photo spots record photo spots as 55 just literally 50 spots less than with our last image then we're going to save these with a unique name for record-keeping purposes okay so to account call that one maybe like processed or something think we'll know what that means you can close that one say that one as well honestly really doesn't matter that much
what you save it as um black spots so you know what it is well that's that thank you so much for watching our video it's the first and hopefully a series of videos that we're going to be doing about how to use image a and various other subjects if you could please like our video that would be awesome and also please subscribe to our Channel and hopefully we'll have more movies for you soon
Ähnliche Videos
12:21
ImageJ Tutorial 2 - Measure Canopy Width &...
UF IFAS Horticultural Crop Physiology Lab
8,766 views
41:36
A beginners guide to ImageJ (and Fiji)
Craig Daly
86,807 views
33:01
ImageJ Basics
Edridge D'Souza
86,188 views

7:40
ImageJ Tutorial 1.4 - Measure Leaf Disease...
UF IFAS Horticultural Crop Physiology Lab
7,411 views
4:46
How to measure Leaf Disease Damage percent...
nrtTAYE
4,238 views

5:55
How to use ImageJ for leaf area? Step-by-s...
Petiole Pro: AI for Agriculture and Forestry
11,537 views
23:36
ImageJ Analysis: Length Measurement, Area ...
SMS TechEdu
602,731 views
8:02
ImageJ Tutorial 1.5 - Measure Leaf Disease...
UF IFAS Horticultural Crop Physiology Lab
4,220 views
4:42
Measuring healthy/diseased leaf area with ...
Juan Edwards
29,582 views
6:58
Using ImageJ to measure size
Dan Puperi
170,646 views
40:56
Measuring gray & color intensity with Imag...
KRU Neuro
32,594 views
5:04
ImageJ Tutorial 1.7 - Count Leaf Lesions (...
UF IFAS Horticultural Crop Physiology Lab
1,197 views

14:08
ImageJ 101 For Every PhD with Image Data!
PhDCoffeeTime
47,684 views
8:38
Automated Cell Counting in ImageJ
Academic Technology at Keene State College
239,767 views
9:34
Using ImageJ to measure cell number and cr...
Dory Video
145,063 views
11:49
How to measure SEED AREA in imageJ| Area m...
Alicerita
3,790 views
7:00
Comparing intensities in different samples...
Alyona Minina
152,481 views
30:06
30 min Introduction to Fiji/ImageJ for bio...
Odlogo
41,949 views